

Introduction
This is the chapter web page to support the content in Chapter 1 of the book: Exploring Raspberry Pi – Interfacing to the Real World with Embedded Linux. The summary introduction to the chapter is as follows:
In this chapter, you are introduced to the Raspberry Pi (RPi) platform hardware. The chapter focuses on recently released Raspberry Pi models and describes the various subsystems and physical inputs/outputs of the boards. In addition, the chapter lists accessories that can prove helpful in developing your own Raspberry Pi-based projects. By the end of this chapter, you should have an appreciation of the power and complexity of this physical-computing platform. You should also be aware of the first steps to take to protect your board from physical damage.
Learning Outcomes
After completing this chapter, you should be able to:
- Describe the capability of the Raspberry Pi (RPi) and its suitability for different project types.
- Describe the major hardware systems and subsystems on the RPi boards.
- Identify important accessories that you can buy to enhance the capability of your RPi.
- Have an appreciation of the power and complexity of the RPi as a physical computing platform.
- Be aware of the first steps to take in protecting your board from physical damage
Digital Media Resources
Here the digital resources referred to in the chapter web page are provided. There are high-resolution versions of some of the important figures and links to videos, resources and websites that are described in the chapter.
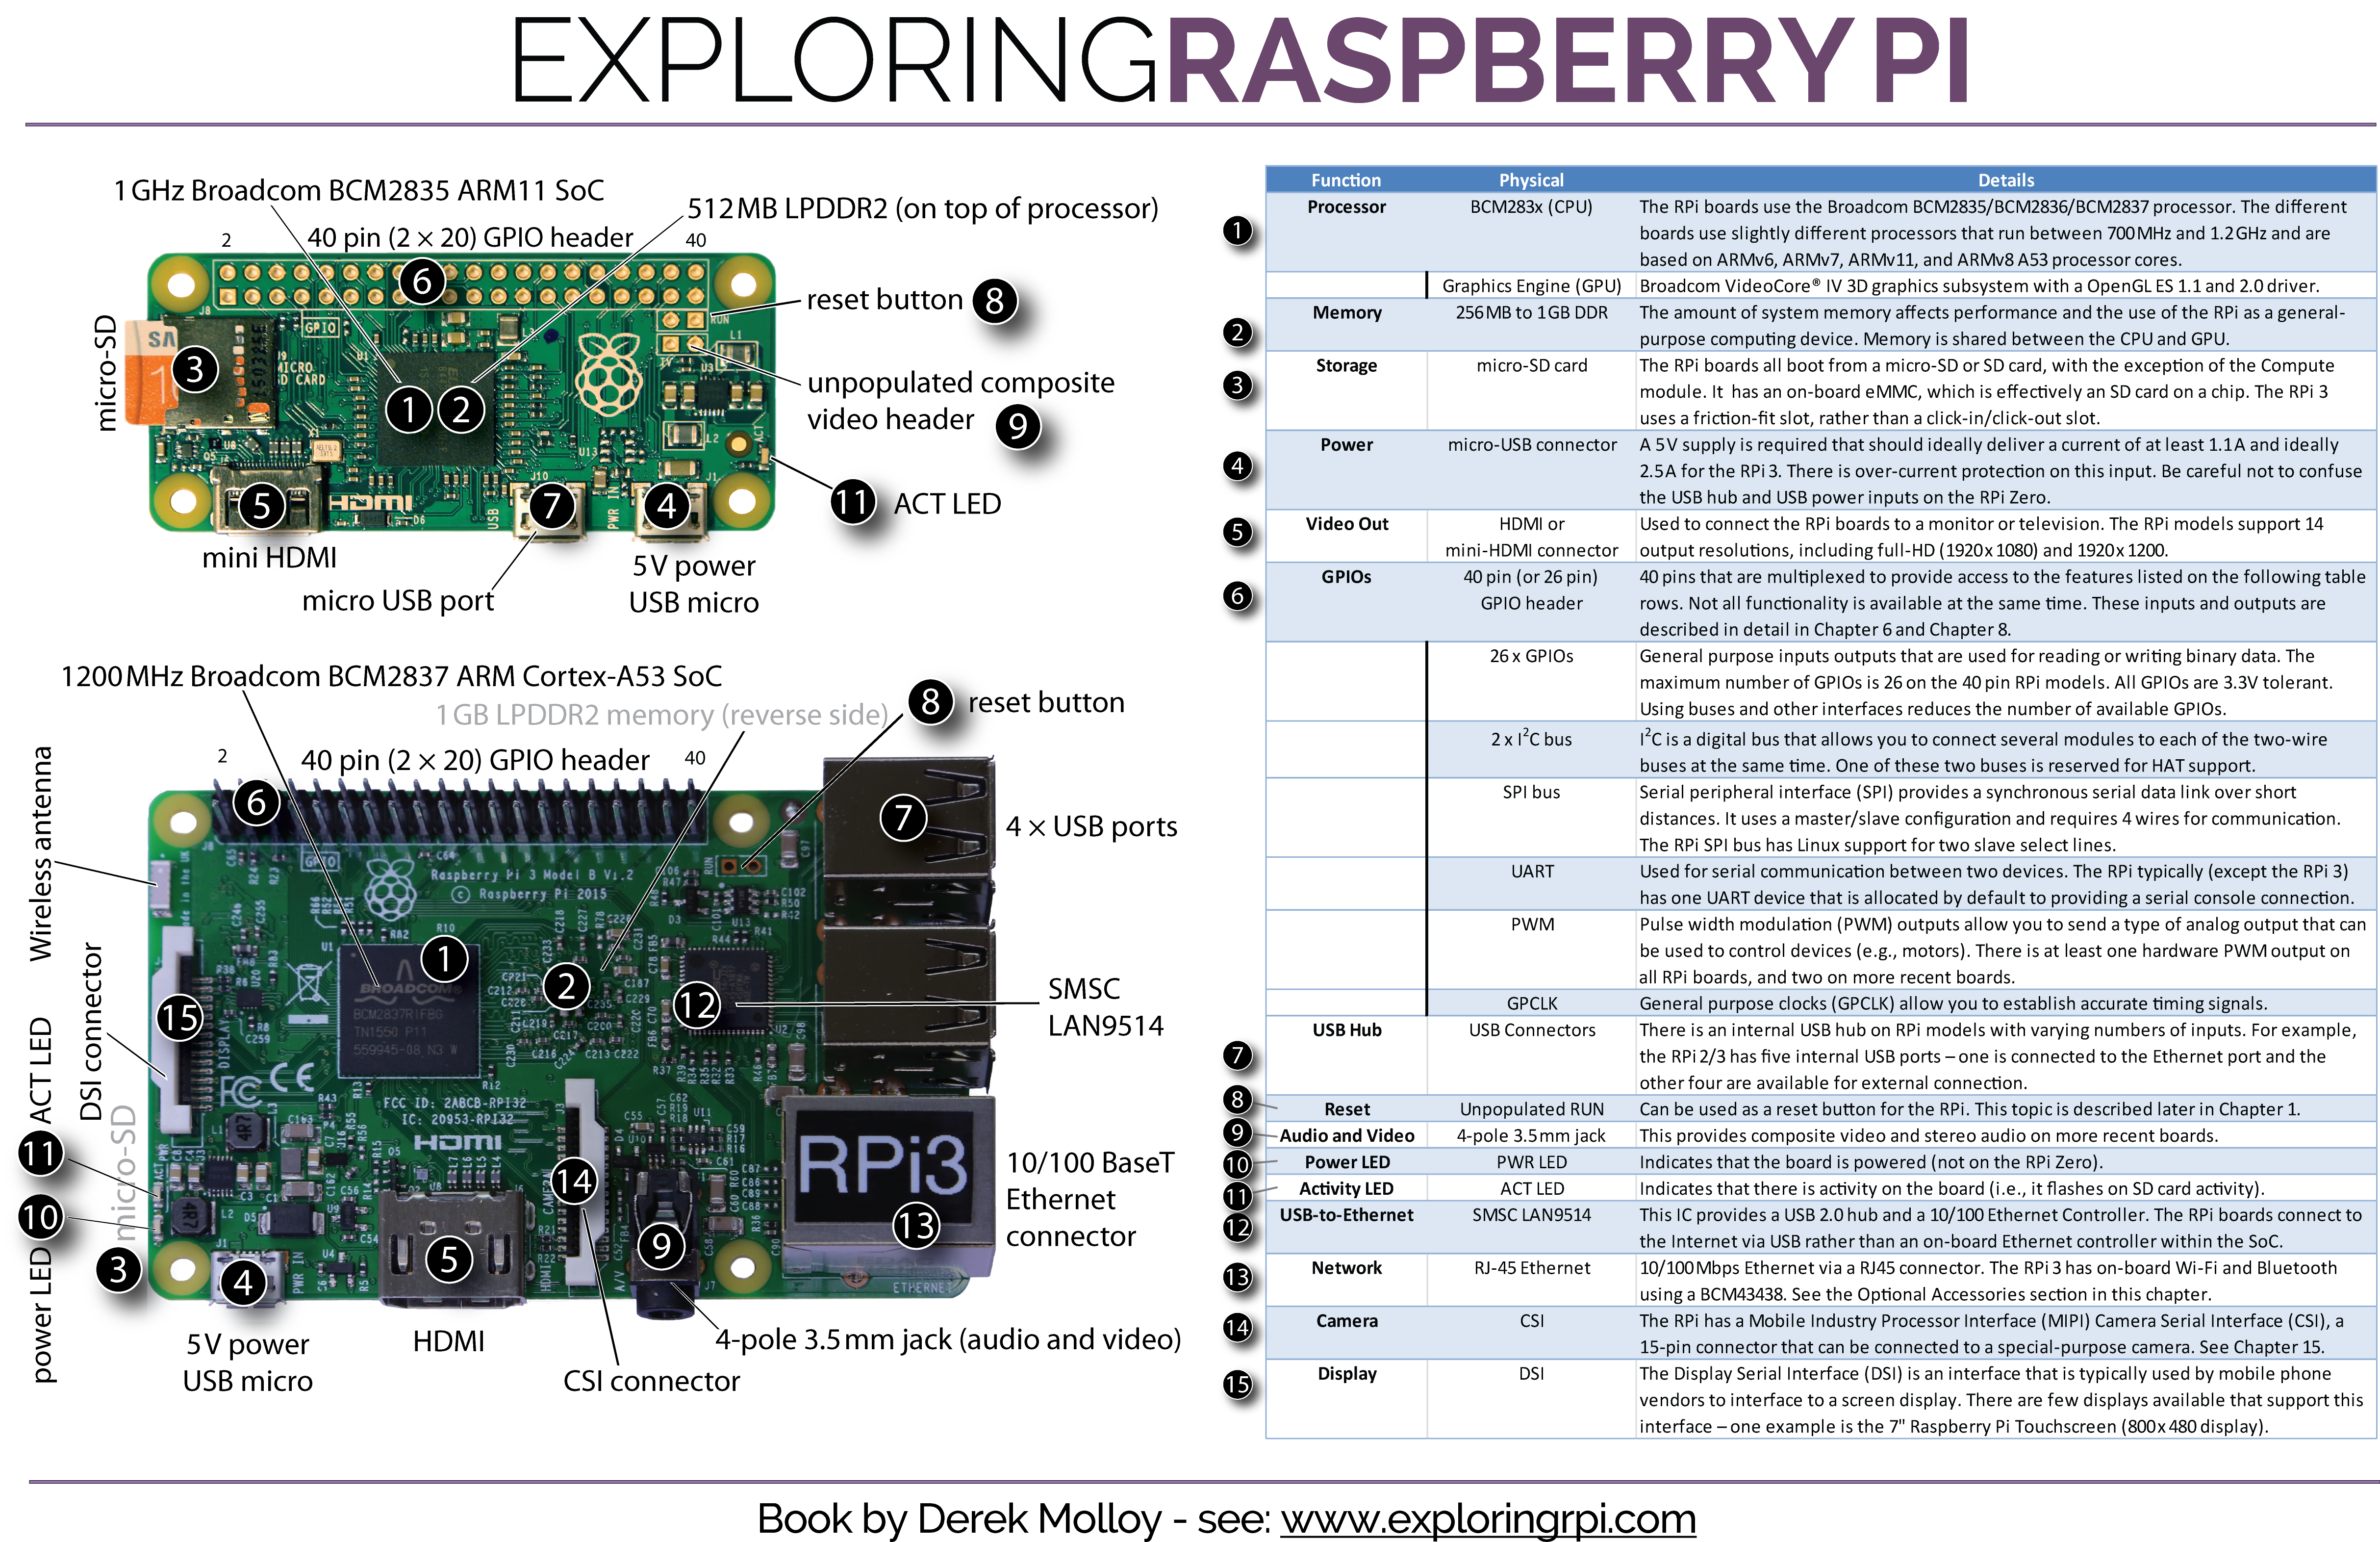
Raspberry Pi Poster
The Raspberry Pi Poster is available for download as high-resolution PNG raster format and a high-resolution PDF vector-mapped format images using the following links:
- The Raspberry Pi Poster [PDF Format (6MB)] [PNG Format (6MB)]
The poster images are large format images that have been rendered for an A3 page size, which is 11.69″ x 16.53″ (29.7cm x 42.0cm) in dimension.
Updates
There has been a recent update to the Raspberry Pi Zero which now means that you can attach the camera to the CSI adapter that is present on the edge of new Raspberry Pi Zero boards. This means that the Zero is now a very suitable board for video streaming applications, especially where weight is a consideration.
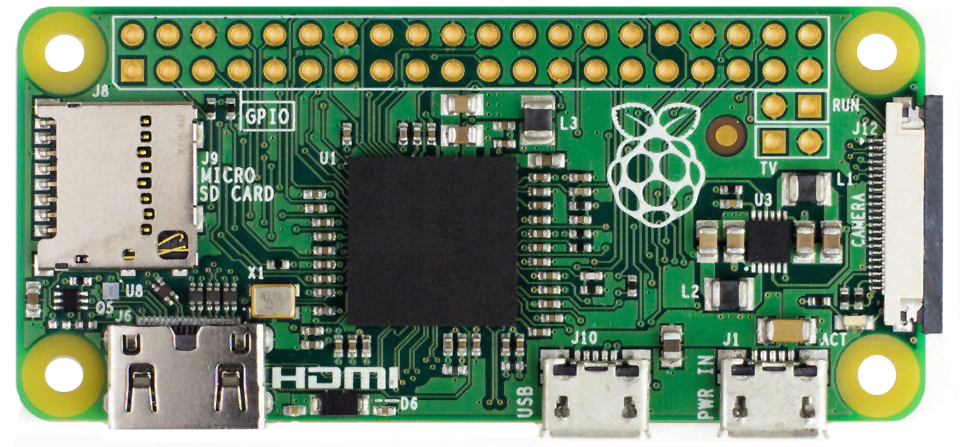
Figure 1.A Raspberry Pi Zero with a CSI connector
Products Described in this Chapter
Here are links to some of the products that are used in this chapter. Please do your own due diligence on these products and the retailers that are identified:
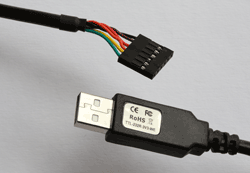
The USB-to-serial UART TTL cable is used throughout this book, for debugging problems with the Raspberry Pi, for viewing and interacting with the console as the board is booting and finally it is used for programming a low-cost Arduino Pro (3.3V) module. There are several products available such as those on Amazon: There is an official TTL-232R-3V3 cable, and lower cost alternatives (that have not been tested) such as the GearMo 3.3V Header-like TTL-232R-3V3 cable.
It is also very useful to have a 2A-3A 5V regulated power supply, especially if you are planning to use the Raspberry Pi 3 or connecting the Raspberry Pi to a Wi-Fi adapter, USB webcam or LCD display. Here are a few such examples: Raspberry Pi Power supplies on Amazon.com.
Other very useful accessories include:
- The Raspberry Pi Camera (now version 3) ($20)
- The Raspberry Pi Sense HAT ($40)
- Raspberry Pi Cases ($7-$15) Be sure to choose one for your precise RPi model (Please note that the LEDs have moved on the revision from the RPi2 to the RPi3, which has a modest impact on your choice of case should you need visibility of the LEDs)
- Samsung USB Reader with a micro-SD Card ($27)
- Raspberry Pi WiFi adapters ($9+) Please note that the RPi 3 has integrated WiFi.
- The T-Cobbler Adapter Board ($8-$10)
- Adafruit RPi Prototyping Plate ($15)
Manufacturing the Raspberry Pi
Metropolis Multimedia has provided a short video that shows the manufacturing of the Raspberry Pi board at the Sony facility in Wales, UK. The use of automated visual inspection in the development cycle is particularly impressive.
External Resources
Important Documents
- The Raspberry Pi Documentation: This is the official documentation for the RPi that is written by the Raspberry Pi Foundation. It includes guides on getting started, configuration, guides to Linux distributions and more. See raspberrypi.org/documentation/
- Broadcom BCM2835 ARM Peripherals Datasheet: This is the core document that describes the processor on most RPi models (except the RPi 2). It is 200 pages long and provides a technical description of the functionality and capabilities of the processor on the RPi. See tiny.cc/erpi103. There is also an important errata document at tiny.cc/erpi104.
- The BCM2836 Document: This document describes features of the processor on the RPi 2 and should be read in association with the previous Broadcom document for the BCM2835. tiny.cc/erpi105.
Important Web Sites
- The Raspberry Pi Foundation website: This provides the main support for the RPi platform, with blogs, software guides, community links, and downloads to support your development. See raspberrypi.org.
Errata
None for the moment
Hi,
I have a query as to how to connect the USB-to-TTL serial cable to the Raspberry Pi3. The cable has six pins at the end, but the book showing how it is connected to the RPI3, I can see only 3 pins, and the text says connect to Pin 6, Pin 8 and Pin 10 of the GPIO header. How is it possible, with the 6 pins on the cable?
Please explain.
Thanks,
Hi. No problem. The 6-cable version of the cable has a GND (ground), CTS (clear to send), VCC (supply voltage), TXD (transmit), RXD (receive), and RTS (request to send) lines. The RPi doesn’t need the CTS and RTS lines in order to connect to the UART. In addition, your RPi is likely powered using the micro-USB cable so it doesn’t need the VCC. Therefore the only pins required are the GND, TXD, and RXD pins. Check the datasheet for your cable but you typically use black (GND), yellow (RXD), and orange (TXD) only. Hope that helps, Derek.
I believe his question was the cable head has 6 wires tied to one header with six holes. They do not match up in order with the suggested pin outs. The picture in chapter 1, Figure 1-7a shows such a cable. I know, because I purchased one just like it on Amazon. I also purchased a breakout USB-TTL item as well and I didn’t find much information on it. As the author, please look at this from the perspective of someone starting out as there is a ton of terminology to learn let alone procedures to get up and running. After the fact, I found a loose 3 wire USB-TTL cable on Amazon just for the RPI.
I believe his question was about the cable picture in chapter 1, figure 1-7a, which has a fixed 6 pin header with the order you mentioned above. That cable can not work on the RPI. I purchase such a cable from Amazon along with a breakout USB-TTL. It would be great to include more material covering the setup of the USB-TTL. Amazon also sales a USB-TTL 3 wire (loose) cable for the RPI. Found this out afterward spending $20 on a cable I can’t use.
Yes, I found the same issue and checked the pins on the rpi3 and saw (fortunately) that 6 pin cable would not work. I also found the 3 Pin cable and bought that one. It is confusing, hope these posts help others.
I am finding this part difficult too but found the answer
1) Note that pin our description on page 15 does not have the order shown in the picture. Black, brown, red, orange, yellow and green. That color matches the coding for the FTDI chip document for the TTL-232R-3V3 , I had bought that cable, successfully set the device manager for it(COM3) in my instance. PUTTY setup and I would get a terminal but no response. I have been using putty for years at work.
2) I bought a ADAFruit USB-TTL https://www.amazon.com/gp/product/B00DJUHGHI/ref=oh_aui_detailpage_o01_s00?ie=UTF8&psc=1 and used instructions at https://learn.adafruit.com/adafruits-raspberry-pi-lesson-5-using-a-console-cable/connect-the-lead. Order for that Black, White, Green on 4,6 and 8 pins . Worked correctly.
So I do have a question, with a Raspberry Pi 3 Model B and NOOBS installed about month ago is there a conflict of having pins 10, 12 and 14 occupied? Perhaps later in your fine book the answer will be there or will find out elsewhere.
It has been an interesting exercise. I learned more by the extra work than if the solution as written had just worked.
Looking forward in forging ahead with your book!!
Frank
There is now a Pi Zero W with included wireless capabilities. Would be nice to include as addition to this chapter.
https://www.raspberrypi.org/products/raspberry-pi-zero-w/