

Introduction
This is the chapter web page to support the content in Chapter 6 of the book: Exploring Raspberry Pi – Interfacing to the Real World with Embedded Linux. The summary introduction to the chapter is as follows:
This chapter integrates the Linux, programming, and electronics groundwork from earlier chapters to show you how to build circuits and write programs that interface to the Raspberry Pi’s single-wire inputs and outputs. In this chapter, you will see practical examples that explain how to use general-purpose input/outputs (GPIOs) to interface to different types of electronic circuits. GPIO interfacing is first performed using sysfs to ensure that you have skills that are transferable to other embedded Linux devices. Next, memory-mapped approaches are investigated that have impressive performance, but are largely specific to the RPi platform. Finally, the wiringPi library of C functions is discussed in detail. It uses sysfs and memory-mapped approaches to provide a custom GPIO interfacing library for the RPi platform that is very accessible. Examples are provided of how it can be used to communicate with one-wire sensors, to generate pulse-width modulated (PWM) signals, and to generate high-frequency timing signals. Finally, there is a brief discussion on the impact of udev rules and Linux permissions on GPIO interfacing.
After completing this chapter, you should hopefully be able to do the following:
- Use an RPi GPIO to output a binary signal to a digital circuit, or read in a binary input from a digital circuit.
- Write shell scripts and efficient C/C++ sysfs code to control GPIOs on the RPi.
- Describe the impact of the PREEMPT kernel patch and multiple CPU cores on the performance of GPIO applications.
- Utilize internal pull-up and pull-down resistors for interfacing.
- Manipulate GPIO state using memory-mapped registers on the RPi’s SoC using the shell prompt and C/C++ program code.
- Use the wiringPi library of C functions to control the RPi’s GPIOs in an efficient and accessible manner.
- Communicate bi-directionally with a sensor using a single GPIO.
- Use PWM on the RPi to fade an LED and drive a servo motor.
- Use general-purpose clocks to output high-frequency clock signals.
- Use Linux udev rules and the setuid bit to improve user-level control of GPIO applications.
Updates
On the most recent kernel releases you may see an error when you try to view the kernel build settings (as described in the section on “The Preemptible Linux Kernel”). To fix this you must load the configs LKM, as below:
|
1 2 3 4 5 6 7 8 9 |
pi@raspberrypi:/proc $ gunzip -c config.gz|grep PREEMPT gzip: config.gz: No such file or directory pi@raspberrypi:/proc $ sudo modprobe configs pi@raspberrypi:/proc $ lsmod |grep configs configs 30692 0 pi@raspberrypi:/proc $ gunzip -c config.gz|grep PREEMPT # CONFIG_PREEMPT_NONE is not set CONFIG_PREEMPT_VOLUNTARY=y # CONFIG_PREEMPT is not set |
Digital Media Resources
Here the digital resources referred to in the chapter web page are provided. There are high-resolution versions of some of the important figures and links to videos, resources and websites that are described in the chapter.
The first figure illustrates the simplified view of the functionality that is available on the GPIO header of the Raspberry Pi 2/3/Zero. Older models of the Raspberry Pi had 26 pins and finished at the dotted line.
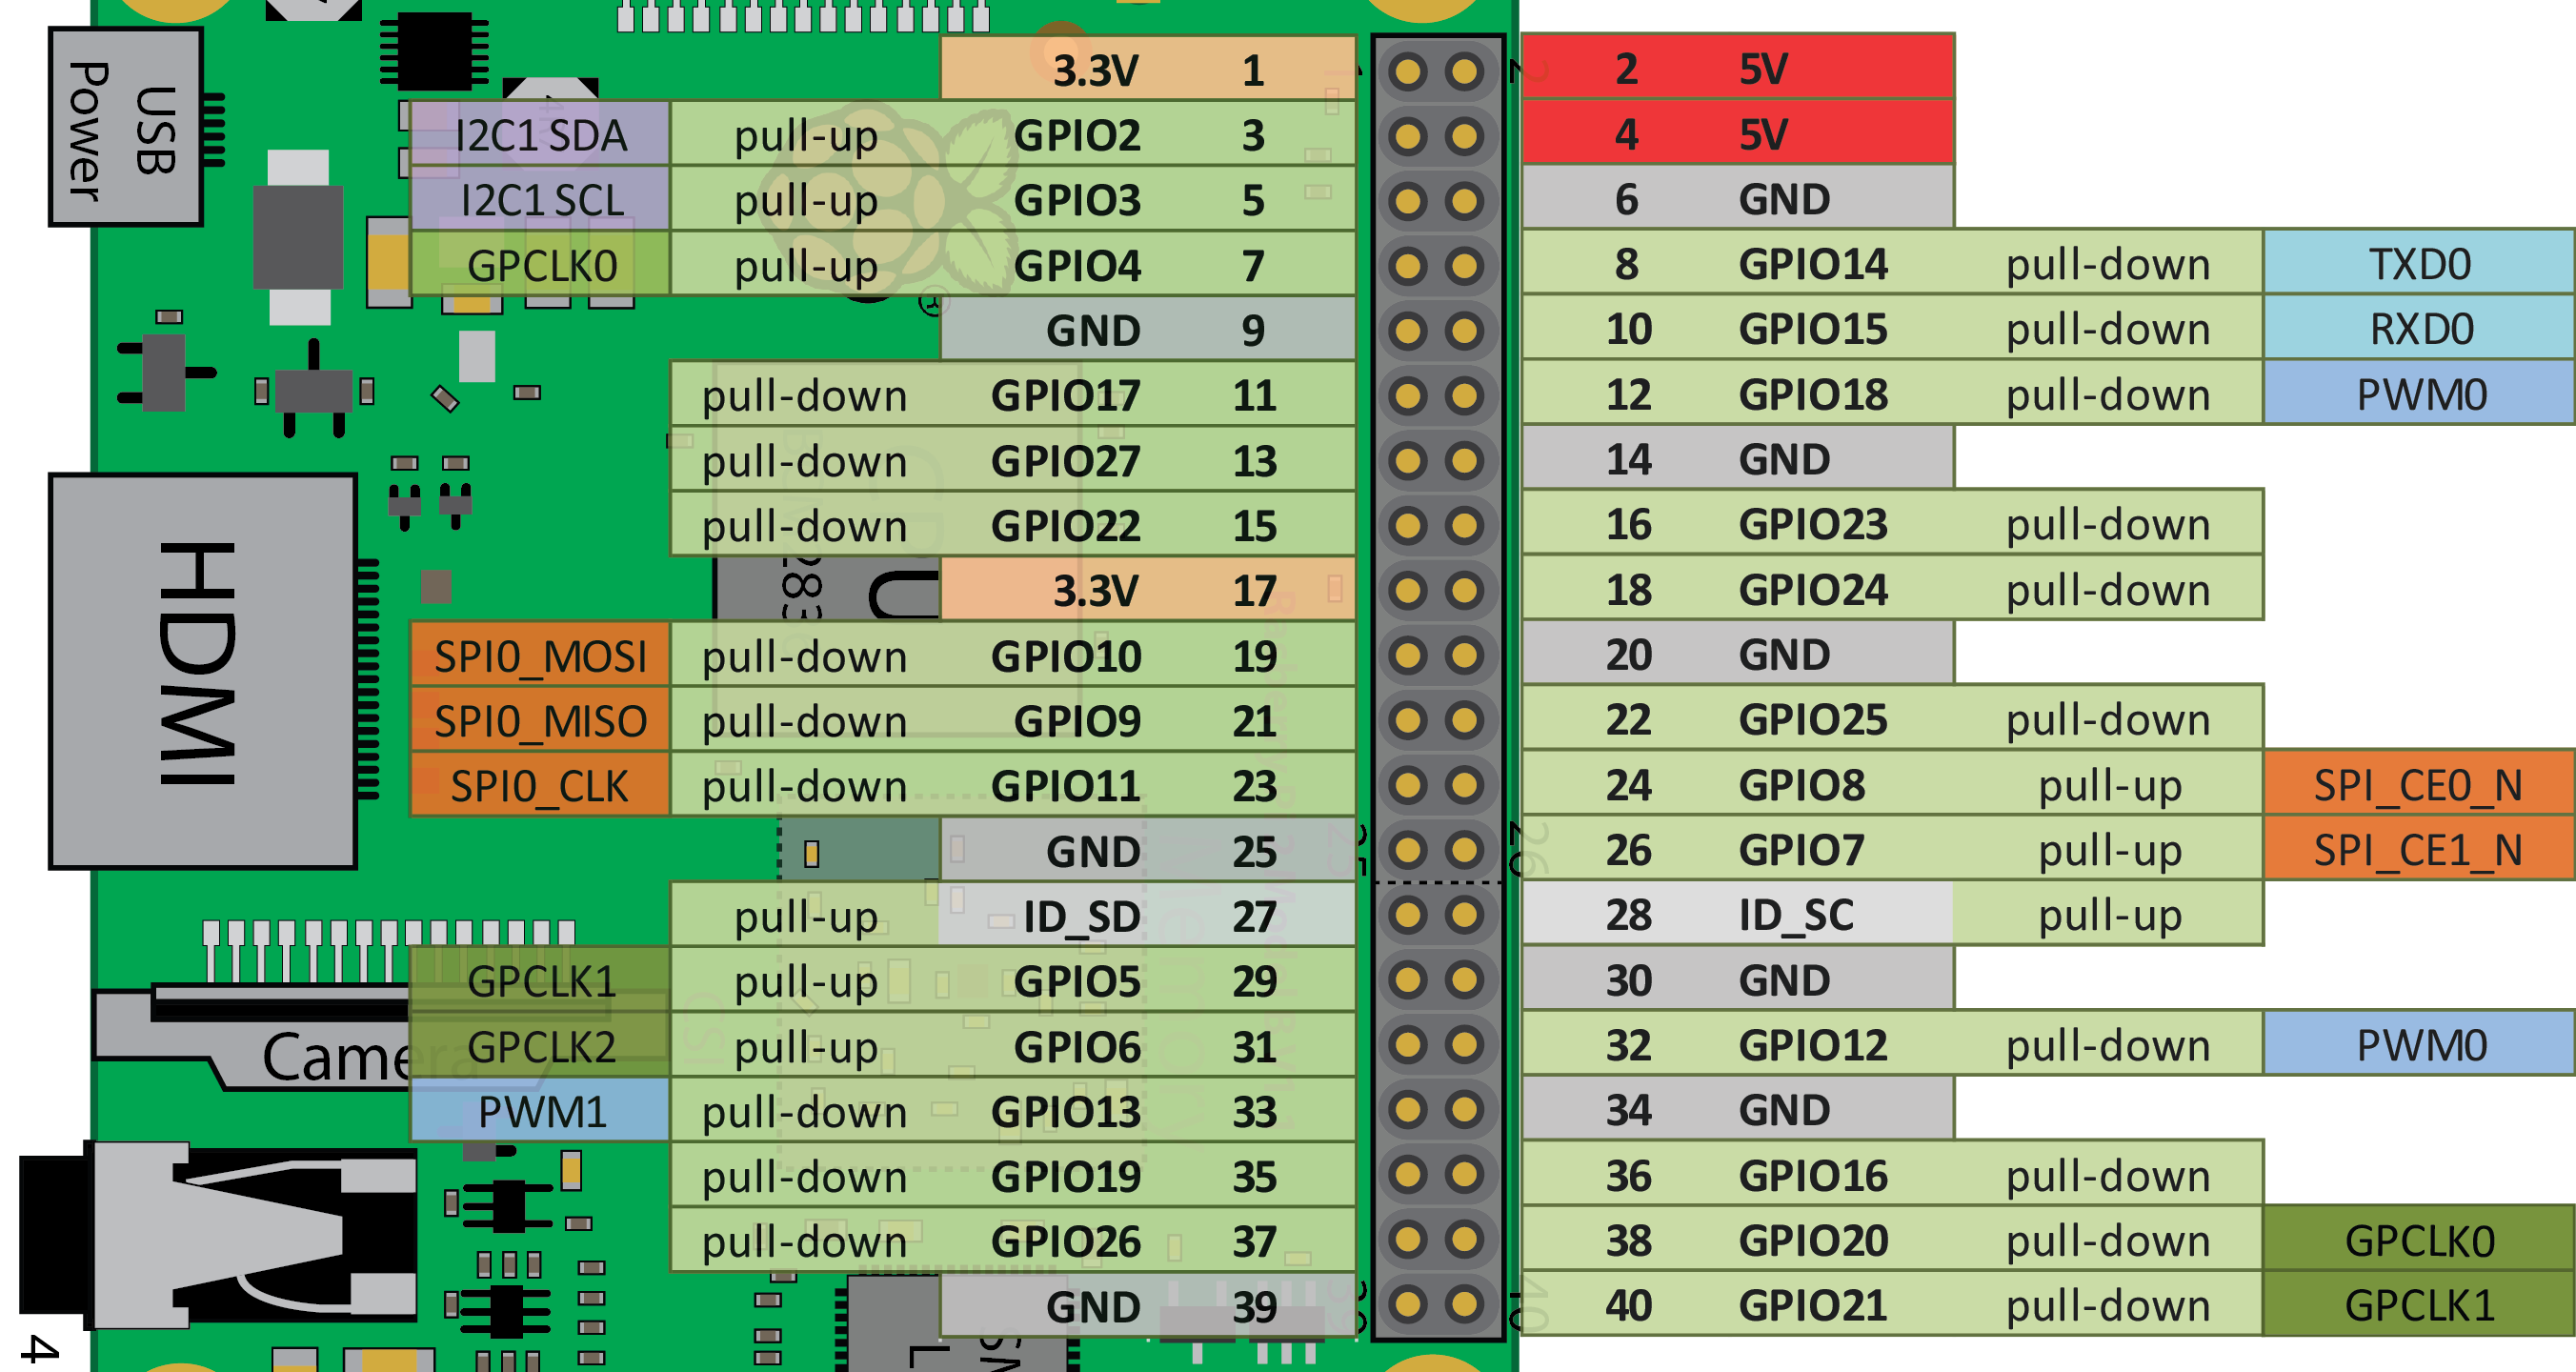
The second figure is a full description of the capabilities of the GPIO header as described in the book.

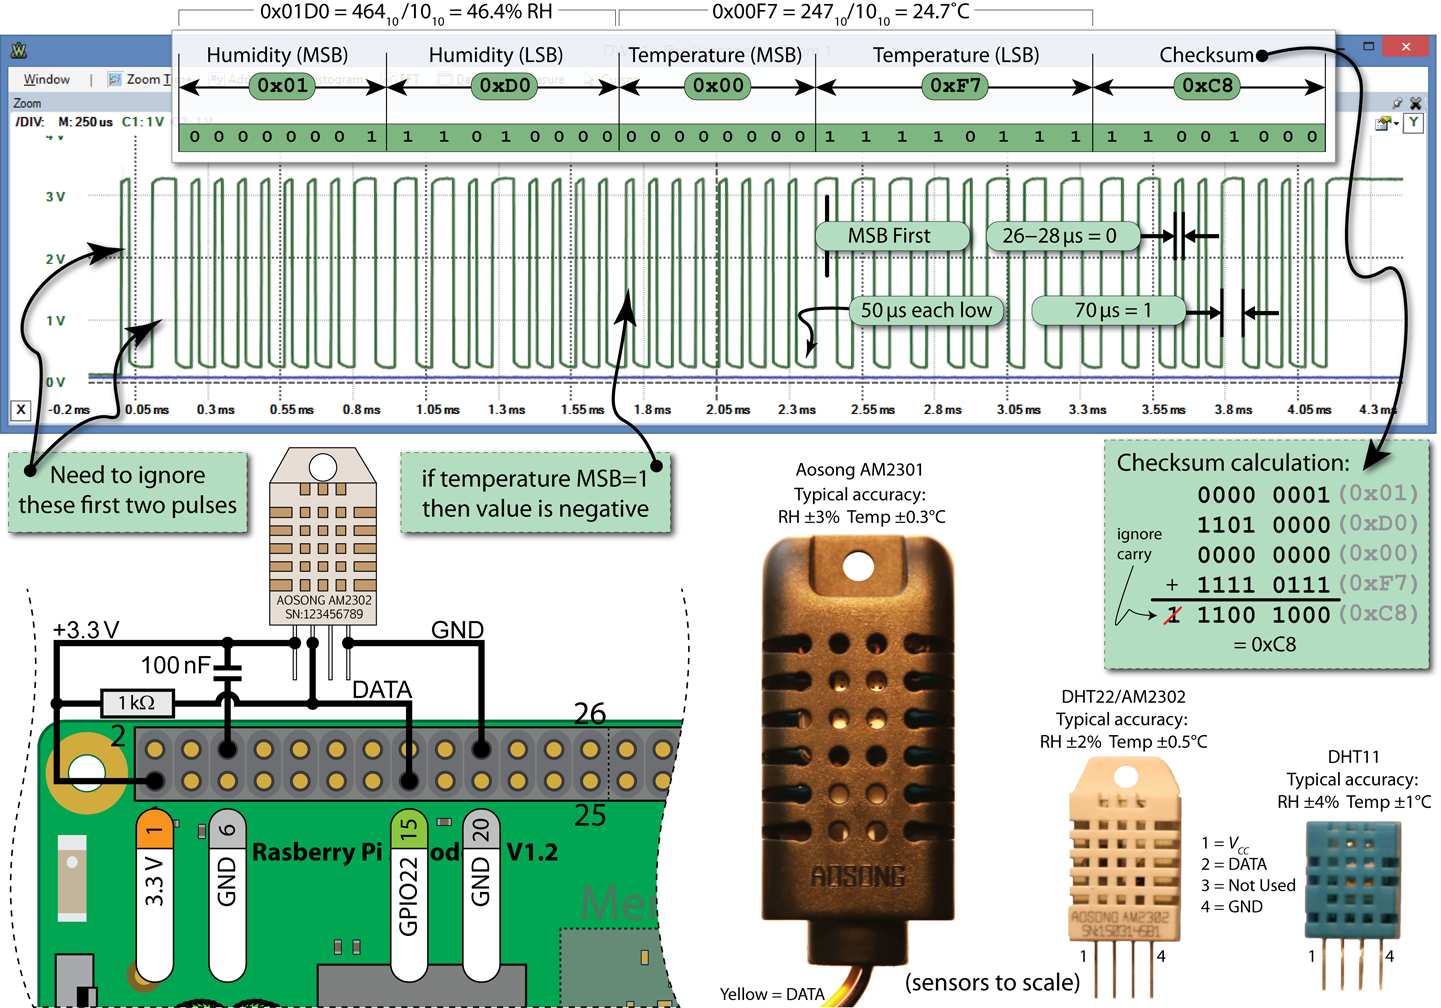
The circuit below describes the connection of a DHT sensor to the RPi using a one-wire GPIO connection. This connection requires the use of memory-mapped I/O, such as that provided using the wiringPi library.
Source Code Examples
The full source code listing for this chapter is available in the GitHub repository directory exploringrpi/chp06. There are the important source code listings for this chapter, which describe how you can interact with a GPIO using a custom class and how you can interact with the GPIOs using the wiringPi library.
|
1 2 3 4 5 6 7 8 9 10 11 12 13 14 15 16 17 18 19 20 21 22 23 24 25 26 27 28 29 30 31 32 33 34 35 36 37 38 39 40 41 42 43 44 45 46 47 48 49 50 51 52 53 54 55 56 57 58 59 60 61 62 63 64 65 66 67 68 69 70 71 72 73 74 75 76 77 78 79 80 81 82 83 84 85 86 87 88 89 90 91 92 93 94 95 96 97 |
/* * GPIO.h Created on: 29 Apr 2015 * Copyright (c) 2015 Derek Molloy (www.derekmolloy.ie) * Made available for the book "Exploring Raspberry Pi" * See: www.exploringrpi.com * Licensed under the EUPL V.1.1 * * This Software is provided to You under the terms of the European * Union Public License (the "EUPL") version 1.1 as published by the * European Union. Any use of this Software, other than as authorized * under this License is strictly prohibited (to the extent such use * is covered by a right of the copyright holder of this Software). * * This Software is provided under the License on an "AS IS" basis and * without warranties of any kind concerning the Software, including * without limitation merchantability, fitness for a particular purpose, * absence of defects or errors, accuracy, and non-infringement of * intellectual property rights other than copyright. This disclaimer * of warranty is an essential part of the License and a condition for * the grant of any rights to this Software. * * For more details, see http://www.derekmolloy.ie/ */ #ifndef GPIO_H_ #define GPIO_H_ #include<string> #include<fstream> using std::string; using std::ofstream; #define GPIO_PATH "/sys/class/gpio/" namespace exploringRPi { typedef int (*CallbackType)(int); enum GPIO_DIRECTION{ INPUT, OUTPUT }; enum GPIO_VALUE{ LOW=0, HIGH=1 }; enum GPIO_EDGE{ NONE, RISING, FALLING, BOTH }; class GPIO { private: int number, debounceTime; string name, path; public: GPIO(int number); // constructor exports pin virtual int getNumber() { return number; } // General Input and Output Settings virtual int setDirection(GPIO_DIRECTION); virtual GPIO_DIRECTION getDirection(); virtual int setValue(GPIO_VALUE); virtual int toggleOutput(); virtual GPIO_VALUE getValue(); virtual int setActiveLow(bool isLow=true); // low=1, high=0 virtual int setActiveHigh(); // default state virtual void setDebounceTime(int time) { this->debounceTime = time; } // Advanced output: faster by keeping the stream open (~20x) virtual int streamOpen(); virtual int streamWrite(GPIO_VALUE); virtual int streamClose(); virtual int toggleOutput(int time); // thread invert output every X ms virtual int toggleOutput(int numberOfTimes, int time); virtual void changeToggleTime(int time) { this->togglePeriod = time; } virtual void toggleCancel() { this->threadRunning = false; } // Advanced input: detect input edges -- threaded and non-threaded virtual int setEdgeType(GPIO_EDGE); virtual GPIO_EDGE getEdgeType(); virtual int waitForEdge(); // waits until button is pressed virtual int waitForEdge(CallbackType callback); // threaded callback virtual void waitForEdgeCancel() { this->threadRunning = false; } virtual ~GPIO(); // destructor unexports the pin private: int write(string path, string filename, string value); int write(string path, string filename, int value); string read(string path, string filename); int exportGPIO(); int unexportGPIO(); ofstream stream; pthread_t thread; CallbackType callbackFunction; bool threadRunning; int togglePeriod; // default 100ms int toggleNumber; // default -1 (infinite) friend void* threadedPoll(void *value); friend void* threadedToggle(void *value); }; void* threadedPoll(void *value); // callback functions for threads void* threadedToggle(void *value); // callback functions for threads } /* namespace exploringRPi */ #endif /* GPIO_H_ */ |
|
1 2 3 4 5 6 7 8 9 10 11 12 13 14 15 16 17 18 19 20 21 22 23 24 25 26 27 28 29 30 31 32 33 34 35 36 37 38 39 40 41 42 43 44 45 46 47 48 49 50 51 52 53 54 55 56 57 58 59 60 61 62 63 64 65 66 67 68 69 70 71 72 73 74 75 76 77 78 79 80 81 82 83 84 85 86 87 88 89 90 91 92 93 94 95 96 97 98 99 100 101 102 103 104 105 106 107 108 109 110 111 112 113 114 115 116 117 118 119 120 121 122 123 124 125 126 127 128 129 130 131 132 133 134 135 136 137 138 139 140 141 142 143 144 145 146 147 148 149 150 151 152 153 154 155 156 157 158 159 160 161 162 163 164 165 166 167 168 169 170 171 172 173 174 175 176 177 178 179 180 181 182 183 184 185 186 187 188 189 190 191 192 193 194 195 196 197 198 199 200 201 202 203 204 205 206 207 208 209 210 211 212 213 214 215 216 217 218 219 220 221 222 223 224 225 226 227 228 229 230 231 232 233 234 235 236 237 238 239 240 241 242 243 244 245 246 247 248 249 250 251 252 253 254 255 256 257 258 259 260 261 262 263 264 265 266 267 268 269 270 271 272 273 274 275 |
/* * GPIO.cpp Created on: 29 Apr 2015 * Copyright (c) 2015 Derek Molloy (www.derekmolloy.ie) * Made available for the book "Exploring Raspberry Pi" * Licensed under the EUPL V.1.1 * * This Software is provided to You under the terms of the European * Union Public License (the "EUPL") version 1.1 as published by the * European Union. Any use of this Software, other than as authorized * under this License is strictly prohibited (to the extent such use * is covered by a right of the copyright holder of this Software). * * This Software is provided under the License on an "AS IS" basis and * without warranties of any kind concerning the Software, including * without limitation merchantability, fitness for a particular purpose, * absence of defects or errors, accuracy, and non-infringement of * intellectual property rights other than copyright. This disclaimer * of warranty is an essential part of the License and a condition for * the grant of any rights to this Software. * * For more details, see http://www.derekmolloy.ie/ */ #include "GPIO.h" #include<iostream> #include<fstream> #include<string> #include<sstream> #include<cstdlib> #include<cstdio> #include<fcntl.h> #include<unistd.h> #include<sys/epoll.h> #include<pthread.h> using namespace std; namespace exploringRPi { /** * * @param number The GPIO number for the RPi */ GPIO::GPIO(int number) { this->number = number; this->debounceTime = 0; this->togglePeriod=100; this->toggleNumber=-1; //infinite number this->callbackFunction = NULL; this->threadRunning = false; ostringstream s; s << "gpio" << number; this->name = string(s.str()); this->path = GPIO_PATH + this->name + "/"; this->exportGPIO(); // need to give Linux time to set up the sysfs structure usleep(250000); // 250ms delay } int GPIO::write(string path, string filename, string value){ ofstream fs; fs.open((path + filename).c_str()); if (!fs.is_open()){ perror("GPIO: write failed to open file "); return -1; } fs << value; fs.close(); return 0; } string GPIO::read(string path, string filename){ ifstream fs; fs.open((path + filename).c_str()); if (!fs.is_open()){ perror("GPIO: read failed to open file "); } string input; getline(fs,input); fs.close(); return input; } int GPIO::write(string path, string filename, int value){ stringstream s; s << value; return this->write(path,filename,s.str()); } int GPIO::exportGPIO(){ return this->write(GPIO_PATH, "export", this->number); } int GPIO::unexportGPIO(){ return this->write(GPIO_PATH, "unexport", this->number); } int GPIO::setDirection(GPIO_DIRECTION dir){ switch(dir){ case INPUT: return this->write(this->path, "direction", "in"); break; case OUTPUT:return this->write(this->path, "direction", "out"); break; } return -1; } int GPIO::setValue(GPIO_VALUE value){ switch(value){ case HIGH: return this->write(this->path, "value", "1"); break; case LOW: return this->write(this->path, "value", "0"); break; } return -1; } int GPIO::setEdgeType(GPIO_EDGE value){ switch(value){ case NONE: return this->write(this->path, "edge", "none"); break; case RISING: return this->write(this->path, "edge", "rising"); break; case FALLING: return this->write(this->path, "edge", "falling"); break; case BOTH: return this->write(this->path, "edge", "both"); break; } return -1; } int GPIO::setActiveLow(bool isLow){ if(isLow) return this->write(this->path, "active_low", "1"); else return this->write(this->path, "active_low", "0"); } int GPIO::setActiveHigh(){ return this->setActiveLow(false); } GPIO_VALUE GPIO::getValue(){ string input = this->read(this->path, "value"); if (input == "0") return LOW; else return HIGH; } GPIO_DIRECTION GPIO::getDirection(){ string input = this->read(this->path, "direction"); if (input == "in") return INPUT; else return OUTPUT; } GPIO_EDGE GPIO::getEdgeType(){ string input = this->read(this->path, "edge"); if (input == "rising") return RISING; else if (input == "falling") return FALLING; else if (input == "both") return BOTH; else return NONE; } int GPIO::streamOpen(){ stream.open((path + "value").c_str()); return 0; } int GPIO::streamWrite(GPIO_VALUE value){ stream << value << std::flush; return 0; } int GPIO::streamClose(){ stream.close(); return 0; } int GPIO::toggleOutput(){ this->setDirection(OUTPUT); if ((bool) this->getValue()) this->setValue(LOW); else this->setValue(HIGH); return 0; } int GPIO::toggleOutput(int time){ return this->toggleOutput(-1, time); } int GPIO::toggleOutput(int numberOfTimes, int time){ this->setDirection(OUTPUT); this->toggleNumber = numberOfTimes; this->togglePeriod = time; this->threadRunning = true; if(pthread_create(&this->thread, NULL, &threadedToggle, static_cast<void*>(this))){ perror("GPIO: Failed to create the toggle thread"); this->threadRunning = false; return -1; } return 0; } // This thread function is a friend function of the class void* threadedToggle(void *value){ GPIO *gpio = static_cast<GPIO*>(value); bool isHigh = (bool) gpio->getValue(); //find current value while(gpio->threadRunning){ if (isHigh) gpio->setValue(HIGH); else gpio->setValue(LOW); usleep(gpio->togglePeriod * 500); isHigh=!isHigh; if(gpio->toggleNumber>0) gpio->toggleNumber--; if(gpio->toggleNumber==0) gpio->threadRunning=false; } return 0; } // Blocking Poll - based on the epoll socket code in the epoll man page int GPIO::waitForEdge(){ this->setDirection(INPUT); // must be an input pin to poll its value int fd, i, epollfd, count=0; struct epoll_event ev; epollfd = epoll_create(1); if (epollfd == -1) { perror("GPIO: Failed to create epollfd"); return -1; } if ((fd = open((this->path + "value").c_str(), O_RDONLY | O_NONBLOCK)) == -1) { perror("GPIO: Failed to open file"); return -1; } //ev.events = read operation | edge triggered | urgent data ev.events = EPOLLIN | EPOLLET | EPOLLPRI; ev.data.fd = fd; // attach the file file descriptor //Register the file descriptor on the epoll instance, see: man epoll_ctl if (epoll_ctl(epollfd, EPOLL_CTL_ADD, fd, &ev) == -1) { perror("GPIO: Failed to add control interface"); return -1; } while(count<=1){ // ignore the first trigger i = epoll_wait(epollfd, &ev, 1, -1); if (i==-1){ perror("GPIO: Poll Wait fail"); count=5; // terminate loop } else { count++; // count the triggers up } } close(fd); if (count==5) return -1; return 0; } // This thread function is a friend function of the class void* threadedPoll(void *value){ GPIO *gpio = static_cast<GPIO*>(value); while(gpio->threadRunning){ gpio->callbackFunction(gpio->waitForEdge()); usleep(gpio->debounceTime * 1000); } return 0; } int GPIO::waitForEdge(CallbackType callback){ this->threadRunning = true; this->callbackFunction = callback; // create the thread, pass the reference, address of the function and data if(pthread_create(&this->thread, NULL, &threadedPoll, static_cast<void*>(this))){ perror("GPIO: Failed to create the poll thread"); this->threadRunning = false; return -1; } return 0; } GPIO::~GPIO() { this->unexportGPIO(); } } /* namespace exploringRPi */ |
|
1 2 3 4 5 6 7 8 9 10 11 12 13 14 15 16 17 18 19 20 21 22 23 24 25 26 27 28 29 30 |
#include <iostream> #include <wiringPi.h> #include <unistd.h> using namespace std; #define LED_GPIO 17 // this is GPIO17, Pin 11 #define BUTTON_GPIO 27 // this is GPIO27, Pin 13 // the Interrupt Service Routine (ISR) to light the LED void lightLED(void){ static int x = 1; digitalWrite(LED_GPIO, HIGH); // turn the LED on cout << "Button pressed " << x++ << " times! LED on" << endl; } int main() { // must be run as root wiringPiSetupGpio(); // use the GPIO numbering pinMode(LED_GPIO, OUTPUT); // the LED pinMode(BUTTON_GPIO, INPUT); // the Button digitalWrite (LED_GPIO, LOW); // LED is off cout << "Press the button on GPIO " << BUTTON_GPIO << endl; // call the lightLED() ISR on the rising edge (i.e., button press) wiringPiISR(BUTTON_GPIO, INT_EDGE_RISING, &lightLED); for(int i=10; i>0; i--){ // countdown to program end cout << "You have " << i << " seconds remaining..." << endl; sleep(1); // sleep for 1 second } return 0; // program ends after 10s } |
|
1 2 3 4 5 6 7 8 9 10 11 12 13 14 15 16 17 18 19 20 21 22 23 24 25 26 27 28 29 30 31 32 33 34 35 36 37 38 39 40 41 42 43 44 45 46 47 48 49 50 51 52 53 54 55 56 57 58 59 60 61 62 63 64 |
#include<iostream> #include<unistd.h> #include<wiringPi.h> #include<iomanip> using namespace std; #define USING_DHT11 false // The DHT11 uses only 8 bits #define DHT_GPIO 22 // Using GPIO 22 for this example #define LH_THRESHOLD 26 // Low=~14, High=~38 - pick avg. int main(){ int humid = 0, temp = 0; cout << "Starting the one-wire sensor program" << endl; wiringPiSetupGpio(); piHiPri(99); TRYAGAIN: // If checksum fails (come back here) unsigned char data[5] = {0,0,0,0,0}; pinMode(DHT_GPIO, OUTPUT); // gpio starts as output digitalWrite(DHT_GPIO, LOW); // pull the line low usleep(18000); // wait for 18ms digitalWrite(DHT_GPIO, HIGH); // set the line high pinMode(DHT_GPIO, INPUT); // now gpio is an input // need to ignore the first and second high after going low do { delayMicroseconds(1); } while(digitalRead(DHT_GPIO)==HIGH); do { delayMicroseconds(1); } while(digitalRead(DHT_GPIO)==LOW); do { delayMicroseconds(1); } while(digitalRead(DHT_GPIO)==HIGH); // Remember the highs, ignore the lows -- a good philosophy! for(int d=0; d<5; d++) { // for each data byte // read 8 bits for(int i=0; i<8; i++) { // for each bit of data do { delayMicroseconds(1); } while(digitalRead(DHT_GPIO)==LOW); int width = 0; // measure width of each high do { width++; delayMicroseconds(1); if(width>1000) break; // missed a pulse -- data invalid! } while(digitalRead(DHT_GPIO)==HIGH); // time it! // shift in the data, msb first if width > the threshold data[d] = data[d] | ((width > LH_THRESHOLD) << (7-i)); } } if (USING_DHT11){ humid = data[0] * 10; // one byte - no fractional part temp = data[2] * 10; // multiplying to keep code concise } else { // for DHT22 (AM2302/AM2301) humid = (data[0]<<8 | data[1]); // shift MSBs 8 bits left and OR LSBs temp = (data[2]<<8 | data[3]); // same again for temperature } unsigned char chk = 0; // the checksum will overflow automatically for(int i=0; i<4; i++){ chk+= data[i]; } if(chk==data[4]){ cout << "The checksum is good" << endl; cout << "The temperature is " << (float)temp/10 << "°C" << endl; cout << "The humidity is " << (float)humid/10 << "%" << endl; } else { cout << "Checksum bad - data error - trying again!" << endl; usleep(2000000); // have to delay for 1-2 seconds between readings goto TRYAGAIN; // a GOTO!!! call yourself a C/C++ programmer! } return 0; } |
|
1 2 3 4 5 6 7 8 9 10 11 12 13 14 15 16 17 18 19 20 21 22 23 |
#include <iostream> #include <wiringPi.h> using namespace std; #define PWM0 12 // this is physical pin 12 #define PWM1 33 // only on the RPi B+/A+/2 int main() { // must be run as root wiringPiSetupPhys(); // use the physical pin numbers pinMode(PWM0, PWM_OUTPUT); // use the RPi PWM output pinMode(PWM1, PWM_OUTPUT); // only on recent RPis // Setting PWM frequency to be 10kHz with a full range of 128 steps // PWM frequency = 19.2 MHz / (divisor * range) // 10000 = 19200000 / (divisor * 128) => divisor = 15.0 = 15 pwmSetMode(PWM_MODE_MS); // use a fixed frequency pwmSetRange(128); // range is 0-128 pwmSetClock(15); // gives a precise 10kHz signal cout << "The PWM Output is enabled" << endl; pwmWrite(PWM0, 32); // duty cycle of 25% (32/128) pwmWrite(PWM1, 64); // duty cycle of 50% (64/128) return 0; // PWM output stays on after exit } |
External Resources
- My EE402 Object-oriented Programming Course Notes: ee402.eeng.dcu.ie
Errata
None for the moment
Thanks for such a great book!
I’m trying use the PIGPIO example on page 269. Unfortunately the output on pin 7 turns off after a couple of seconds. It is not staying on until the user presses enter. Any ideas.
Regards,
John E
Thanks John, you may have to check that with the PIGPIO guys — I didn’t see that behavior but it could be as a result of a recent update and they would be glad of the info. Kind regards, Derek.
Hi Derek
Really enjoying the book. Really nice breadth and great examples.
I’ve a question about the diagrams such as the three above. What tools are you using to make them? They look like great tools to document projects!
Thx
Neil
Thanks Neil, I draw all of the figures using Adobe Illustrator. It gives you a great deal of control over the layouts, but most steps are quite manual, so it needs patience. I try to draw the figure first and then wire the circuit so as to avoid introducing errors into the text. Kind regards, Derek.
In the first figure we can see that some of the GPIO pins are pulled-up and some of them are pulled-down. The books of Warren Gay is also saying about these resistances. But I have no idea about these pull-up and pull-down resistance before reading this book. In the book you are also mentioned about how to measure these resistance values using DMM and potential divider rule. However this is an excellent book with excellent diagrams. This book is better than Mastering the Raspberry Pi and Raspberry Pi hardware reference written by Warren Gay due to Exploring Raspberry Pi has better illustration than these books. Derek Molloy you show that one image is powerful than 1000 words.
I have enjoyed you book very much.
I did have an issue with the with chapter 6 wiringPi programs that use pwm (pwm, fadeLED, and servo). When I ran the programs, they would lock up the Raspberry Pi and I was forced to reboot. I could run the demo manually with the gpio program. Finally, I found that using sudo (e.g., sudo ./servo) would run the programs as expected. I don’t know why, but it may be because the Raspbian distribution that I used had the wiringPi installed so I did not do the wiringPi install that you showed in the book. I hope that this might help anyone that ran into the same issue and save them some time.
I ‘m having the same issues while running wiringPi programs. The Raspberry Pi locks up each time I try to run any of the programs under wiringPi.
Still having a great time learning from this book.
I have a question about the Pi related to the push button input circuit of Figure 6.5b: I wired a Pi3 into a project with a switch (instead of a push button) but otherwise configured exactly as shown in the example. It worked fine until I rebooted the Pi – in fact, with the circuit connected and the switch in a state connecting GPIO4 to GND the Pi would not power up. The Pi did boot after I would either disconnect the circuit or toggle the switch to the open state (GPIO4 no longer connected to GND), but I think that pin is now damaged. For example, GPIO4 always shows as exported after booting now, and trying to set “direction” to “out” causes the Pi to shut down (even with nothing connected to the pin).
I am curious whether having pin 7 (GPIO4) connected to GND during boot up is resulting in a short, or at least an over current condition, to ground? What might be the reason for this, and how might one know what pins may be safely wired into a project circuit between power up events?
Doh! Solved my own problem… It turns out the RPi that I was SSH-ed into had a HAT connected (Witty Pi 2) that also made use of GPIO4 (as and input). When I reconfigured the port as an output it was being pulled low by default, which commanded a shutdown through the Witty Pi.
Live and learn…
Hi,
I have a strange problem, whenever I reboot my raspberry pi, whatever files i have done ( i was trying to write my own code in C++) disappears. I was trying to save my code in Documents Folder, and it stays there as long as the raspberry Pi is powered on. As soon as I shutdown and restart i do not see any files I have saved.
Thanks
Does anyone know why I can’t save a file in raspberry Pi? I was trying to write my own C++ code. As long as the raspberry pi is On, I can access the file, work on it. But as soon as I reboot the raspberry Pi, the file disappears. I tried saving the file in all of the folders – Documents, Templates, Desktop, Downloads, etc., but wherever I save the file, it disappears as soon as I restart the raspberry pi.
Hi there, is your SD card in read-only mode? Some of them have a switch on the side of the card. Kind regards, Derek.
A few notes:
I can confirm Craig’s issue with needing sudo for pwm.cpp.
For anyone struggling to have your temperature sensor in dht.cpp give you data, I found that when I measured the pulses with my scope they were much longer. 26 us for low and 68 us for high. I followed Derek’s lead and used the average of 46. This gave me much better results. For reference, I’m using AM2302.
Also, lartmaker.nl is no longer online, but you can still download the file from the web archive.
Hi Derek,
I’m having have a good time pass with the book and physical computing. Thank you !
I have some issue with the expample fadeLED.cpp (chap 06). When I executed the code (downloaded from github), the LED went on and repeatedly (3 or 4 times) I lost my network connection so I couldn’t shutdown gracefully. Hence I had to restart my RPi. On retrying it said something like /sys/class/gpio/gpio27 couldn’t not be found and subsequently I couldn’t run commands like ls or sudo shutdown. I followed the connections as in figure 6-20 b. Now couple of questions 1. what could have possibly gone wrong, 2. if something like this happens how do I shutdown my RPi gracefully.
Any help or pointers is really appreicated.
Is it possible to reset the GPIO port to its original state without having to reset the pasperry? Is there any command for it?
es posible restablecer el puerto GPIO a su estado original sin tener que restablecer la pasperry? existe algún comando para ello?