

Introduction
This is the chapter web page to support the content in Chapter 8 of the book: Exploring Raspberry Pi – Interfacing to the Real World with Embedded Linux. The summary introduction to the chapter is as follows:
This chapter describes bus communication in detail, explaining and comparing the different bus types that are available on the Raspberry Pi. It describes how you can configure them for use, and how you can communicate with and control I2C, SPI, and UART devices, using both Linux tools and custom-developed C/C++ code. Practical examples are provided using different low-cost bus devices, such as a real-time clock, an accelerometer, a serial shift register with a seven-segment display, a USB-to-TTL 3.3 V cable, and a GPS receiver. After reading this chapter, you should have the skills necessary to begin interfacing almost any type of bus device to the Raspberry Pi.
After completing this chapter, you should hopefully be able to do the following:
- Describe the most commonly used buses or interfaces that are available on the RPi, and choose the correct bus to use for your application.
- Configure the RPi to enable I2C, SPI, and UART capabilities.
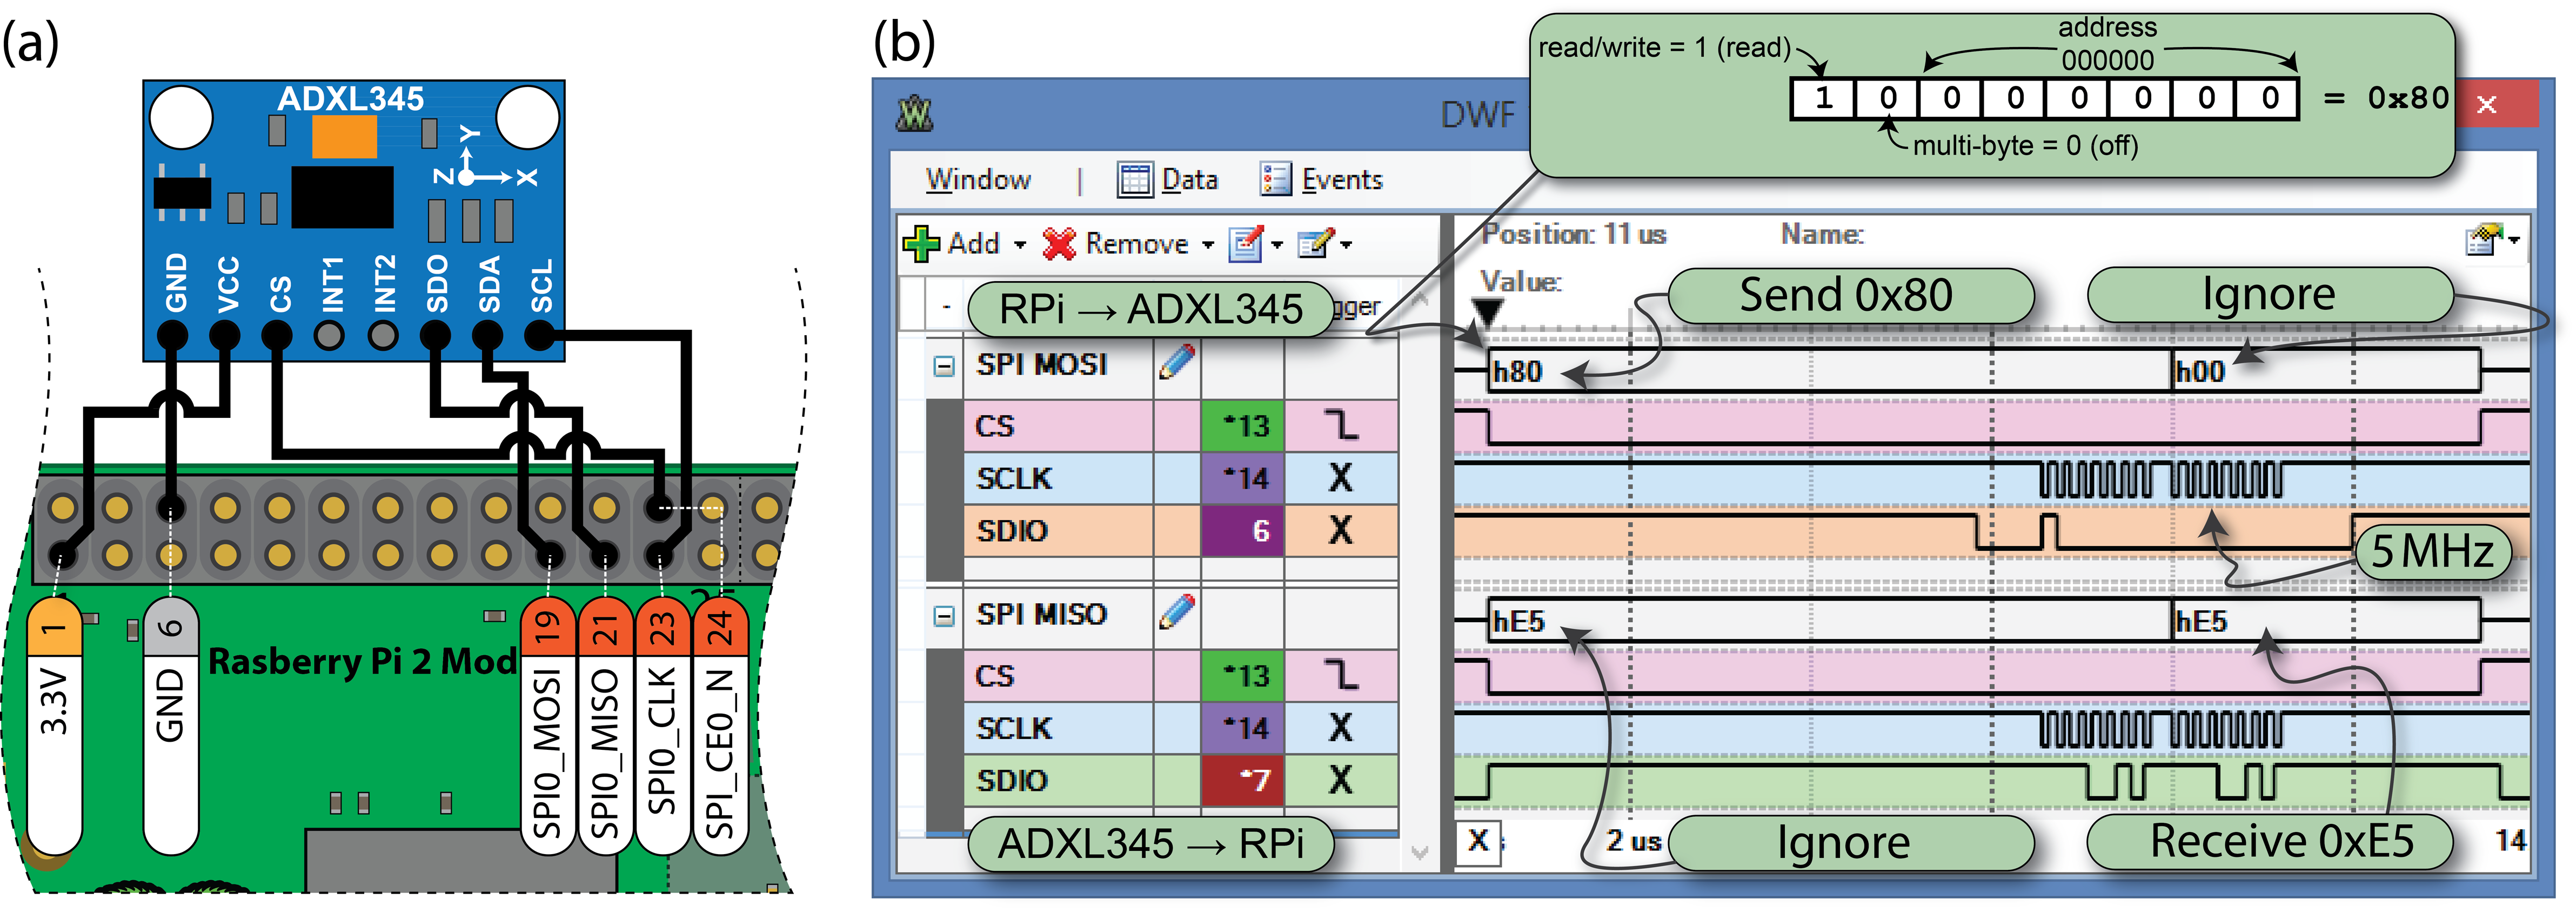
- Attach circuits to the RPi that interface to its I2C bus, and use the Linux I2C-tools to communicate with those circuits.
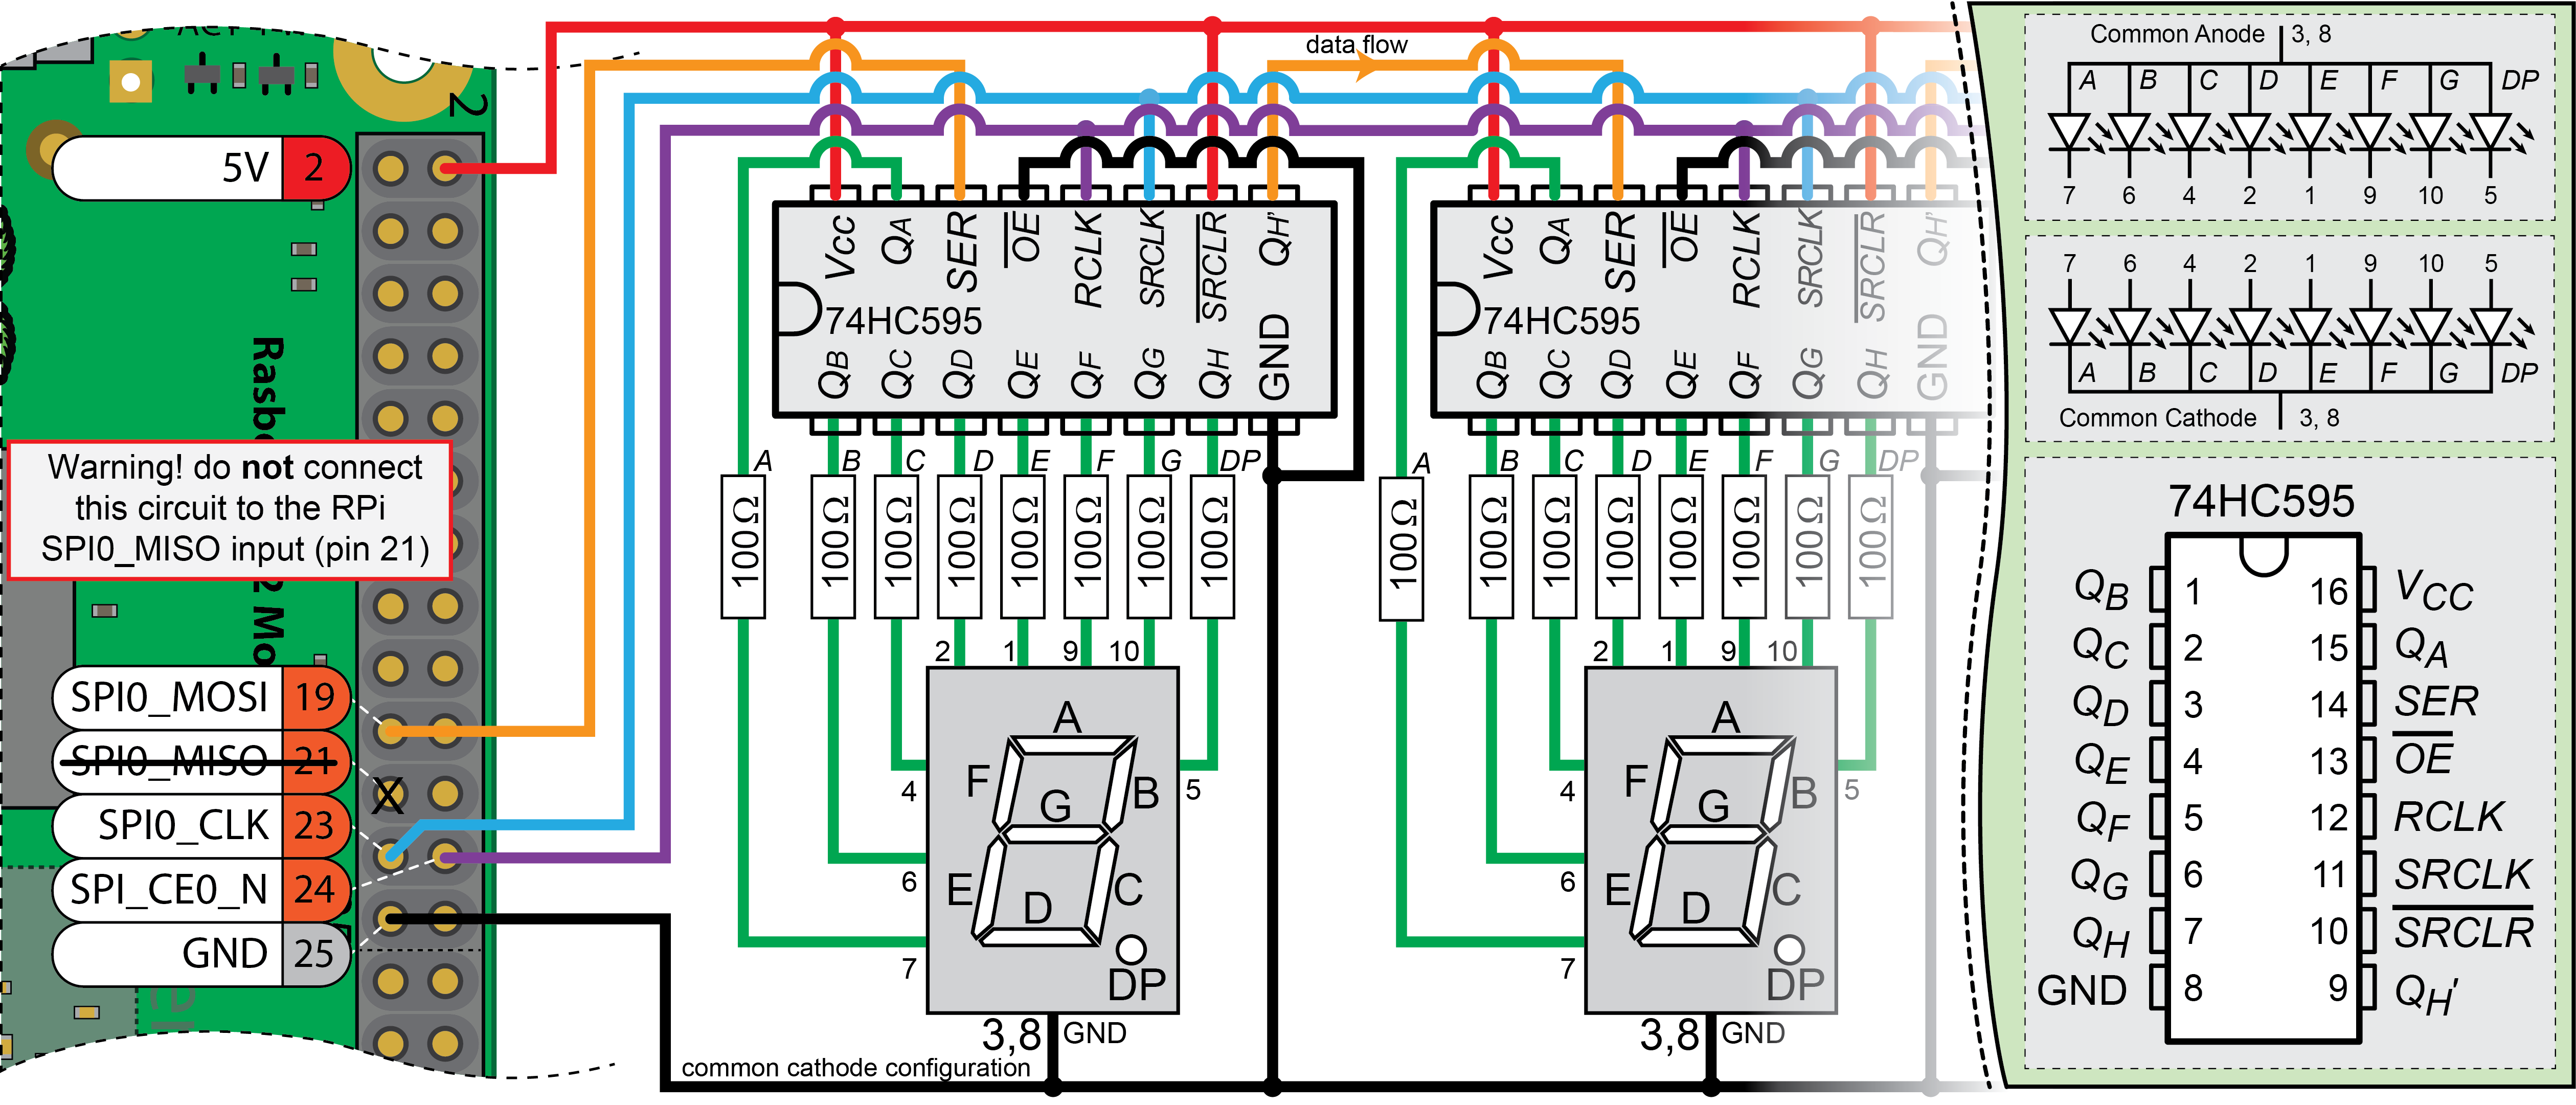
- Build circuits that interface to the SPI bus using shift registers, and write C code that controls low-level SPI communication.
- Write C/C++ code that interfaces to and “wraps” the functionality of devices attached to the I2C and SPI buses.
- Communicate between UART devices using both Linux tools and custom C code.
- Build a basic distributed system that uses UART connections to the RPi to allow it to be controlled from a desktop PC.
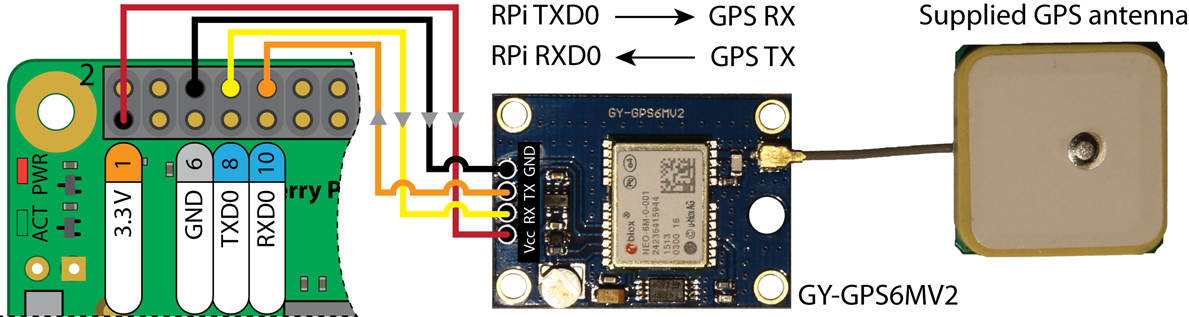
- Interface to a low-cost GPS sensor using a UART connection.
- Add logic-level translation circuitry to your circuits in order to communicate between devices with different logic-level voltages.
Digital Media Resources

An I²C Tutorial Video
In this video I discuss the I²C bus and how we can connect and program devices attached to the bus using C/C++. I explain the use of i2c-tools on embedded Linux and then show how we can interface to a digital accelerometer (Bosch BMA180) or any other I²C device. Finally, I show how we can use sysfs to build a C++ class that wraps the functionality of the digital accelerometer. This video is implemented on the BeagleBone, but the steps are identical for the Raspberry Pi.
Source Code Examples
All of the source code that is described in this book is available in a public GitHub repository: Derek Molloy Exploring Raspberry Pi repository.
You can clone this repository on a Linux desktop computer or your Raspberry Pi using the command:
|
1 |
git clone https://github.com/derekmolloy/exploringrpi.git |
The code for this chapter can be accessed in the chp08 folder of the cloned repository. The formatted code is provided here for your convenience.
|
1 2 3 4 5 6 7 8 9 10 11 12 13 14 15 16 17 18 19 20 21 22 23 24 25 26 27 28 29 30 31 32 33 34 35 36 37 38 39 40 41 42 43 44 45 46 47 48 49 50 51 52 53 54 55 56 |
/* * I2C.h Created on: 17 May 2014 * Copyright (c) 2014 Derek Molloy (www.derekmolloy.ie) * Made available for the book "Exploring Raspberry Pi" * See: www.exploringrpi.com * Licensed under the EUPL V.1.1 * * This Software is provided to You under the terms of the European * Union Public License (the "EUPL") version 1.1 as published by the * European Union. Any use of this Software, other than as authorized * under this License is strictly prohibited (to the extent such use * is covered by a right of the copyright holder of this Software). * * This Software is provided under the License on an "AS IS" basis and * without warranties of any kind concerning the Software, including * without limitation merchantability, fitness for a particular purpose, * absence of defects or errors, accuracy, and non-infringement of * intellectual property rights other than copyright. This disclaimer * of warranty is an essential part of the License and a condition for * the grant of any rights to this Software. * * For more details, see http://www.derekmolloy.ie/ */ #ifndef I2C_H_ #define I2C_H_ #define I2C_0 "/dev/i2c-0" #define I2C_1 "/dev/i2c-1" namespace exploringRPi { /** * @class I2CDevice * @brief Generic I2C Device class that can be used to connect to any type of I2C device and read or write to its registers */ class I2CDevice{ private: unsigned int bus; unsigned int device; int file; public: I2CDevice(unsigned int bus, unsigned int device); virtual int open(); virtual int write(unsigned char value); virtual unsigned char readRegister(unsigned int registerAddress); virtual unsigned char* readRegisters(unsigned int number, unsigned int fromAddress=0); virtual int writeRegister(unsigned int registerAddress, unsigned char value); virtual void debugDumpRegisters(unsigned int number = 0xff); virtual void close(); virtual ~I2CDevice(); }; } /* namespace exploringRPi */ #endif /* I2C_H_ */ |
|
1 2 3 4 5 6 7 8 9 10 11 12 13 14 15 16 17 18 19 20 21 22 23 24 25 26 27 28 29 30 31 32 33 34 35 36 37 38 39 40 41 42 43 44 45 46 47 48 49 50 51 52 53 54 55 56 57 58 59 60 61 62 63 64 65 66 67 68 69 70 71 72 73 74 75 76 77 78 79 80 81 82 83 84 85 86 87 88 89 90 91 92 93 94 95 96 97 98 99 100 101 102 103 104 105 106 107 108 109 110 111 112 113 114 115 116 117 118 119 120 121 122 123 124 125 126 127 128 129 130 131 132 133 134 135 136 137 138 139 140 141 142 143 144 145 146 147 148 149 150 151 152 153 154 155 156 157 158 159 160 161 162 163 164 165 166 167 168 169 170 171 172 173 174 |
/* * I2C.cpp Created on: 17 May 2014 * Copyright (c) 2014 Derek Molloy (www.derekmolloy.ie) * Made available for the book "Exploring Raspberry Pi" * See: www.exploringrpi.com * Licensed under the EUPL V.1.1 * * This Software is provided to You under the terms of the European * Union Public License (the "EUPL") version 1.1 as published by the * European Union. Any use of this Software, other than as authorized * under this License is strictly prohibited (to the extent such use * is covered by a right of the copyright holder of this Software). * * This Software is provided under the License on an "AS IS" basis and * without warranties of any kind concerning the Software, including * without limitation merchantability, fitness for a particular purpose, * absence of defects or errors, accuracy, and non-infringement of * intellectual property rights other than copyright. This disclaimer * of warranty is an essential part of the License and a condition for * the grant of any rights to this Software. * * For more details, see http://www.derekmolloy.ie/ */ #include"I2CDevice.h" #include<iostream> #include<sstream> #include<fcntl.h> #include<stdio.h> #include<iomanip> #include<unistd.h> #include<sys/ioctl.h> #include<linux/i2c.h> #include<linux/i2c-dev.h> using namespace std; #define HEX(x) setw(2) << setfill('0') << hex << (int)(x) namespace exploringRPi { /** * Constructor for the I2CDevice class. It requires the bus number and device number. The constructor * opens a file handle to the I2C device, which is destroyed when the destructor is called * @param bus The bus number. * @param device The device ID on the bus. */ I2CDevice::I2CDevice(unsigned int bus, unsigned int device) { this->file=-1; this->bus = bus; this->device = device; this->open(); } /** * Open a connection to an I2C device * @return 1 on failure to open to the bus or device, 0 on success. */ int I2CDevice::open(){ string name; if(this->bus==0) name = I2C_0; else name = I2C_1; if((this->file=::open(name.c_str(), O_RDWR)) < 0){ perror("I2C: failed to open the bus\n"); return 1; } if(ioctl(this->file, I2C_SLAVE, this->device) < 0){ perror("I2C: Failed to connect to the device\n"); return 1; } return 0; } /** * Write a single byte value to a single register. * @param registerAddress The register address * @param value The value to be written to the register * @return 1 on failure to write, 0 on success. */ int I2CDevice::writeRegister(unsigned int registerAddress, unsigned char value){ unsigned char buffer[2]; buffer[0] = registerAddress; buffer[1] = value; if(::write(this->file, buffer, 2)!=2){ perror("I2C: Failed write to the device\n"); return 1; } return 0; } /** * Write a single value to the I2C device. Used to set up the device to read from a * particular address. * @param value the value to write to the device * @return 1 on failure to write, 0 on success. */ int I2CDevice::write(unsigned char value){ unsigned char buffer[1]; buffer[0]=value; if (::write(this->file, buffer, 1)!=1){ perror("I2C: Failed to write to the device\n"); return 1; } return 0; } /** * Read a single register value from the address on the device. * @param registerAddress the address to read from * @return the byte value at the register address. */ unsigned char I2CDevice::readRegister(unsigned int registerAddress){ this->write(registerAddress); unsigned char buffer[1]; if(::read(this->file, buffer, 1)!=1){ perror("I2C: Failed to read in the value.\n"); return 1; } return buffer[0]; } /** * Method to read a number of registers from a single device. This is much more efficient than * reading the registers individually. The from address is the starting address to read from, which * defaults to 0x00. * @param number the number of registers to read from the device * @param fromAddress the starting address to read from * @return a pointer of type unsigned char* that points to the first element in the block of registers */ unsigned char* I2CDevice::readRegisters(unsigned int number, unsigned int fromAddress){ this->write(fromAddress); unsigned char* data = new unsigned char[number]; if(::read(this->file, data, number)!=(int)number){ perror("IC2: Failed to read in the full buffer.\n"); return NULL; } return data; } /** * Method to dump the registers to the standard output. It inserts a return character after every * 16 values and displays the results in hexadecimal to give a standard output using the HEX() macro * that is defined at the top of this file. The standard output will stay in hexadecimal format, hence * the call on the last like. * @param number the total number of registers to dump, defaults to 0xff */ void I2CDevice::debugDumpRegisters(unsigned int number){ cout << "Dumping Registers for Debug Purposes:" << endl; unsigned char *registers = this->readRegisters(number); for(int i=0; i<(int)number; i++){ cout << HEX(*(registers+i)) << " "; if (i%16==15) cout << endl; } cout << dec; } /** * Close the file handles and sets a temporary state to -1. */ void I2CDevice::close(){ ::close(this->file); this->file = -1; } /** * Closes the file on destruction, provided that it has not already been closed. */ I2CDevice::~I2CDevice() { if(file!=-1) this->close(); } } /* namespace exploringRPi */ |
|
1 2 3 4 5 6 7 8 9 10 11 |
#include<wiringPiI2C.h> #include<stdio.h> int main(){ int fd = wiringPiI2CSetup(0x68); int secs = wiringPiI2CReadReg8(fd, 0x00); int mins = wiringPiI2CReadReg8(fd, 0x01); int hours = wiringPiI2CReadReg8(fd, 0x02); printf("The RTC time is %2d:%02d:%02d\n", hours, mins, secs); return 0; } |
|
1 2 3 4 5 6 7 8 9 10 11 12 13 14 15 16 17 18 19 20 21 22 23 24 25 26 27 28 29 30 31 32 33 34 35 36 37 38 39 40 41 42 43 44 45 46 47 48 49 50 51 52 53 54 55 56 57 58 59 60 61 62 63 64 65 66 67 68 69 70 71 72 73 74 75 76 77 78 |
/** SPI C Seven-Segment Display Example, Written by Derek Molloy (www.derekmolloy.ie) * for the book Exploring Raspberry Pi. Based on the spidev_test.c code * example at www.kernel.org */ #include<stdio.h> #include<fcntl.h> #include<unistd.h> #include<sys/ioctl.h> #include<stdint.h> #include<linux/spi/spidev.h> #define SPI_PATH "/dev/spidev0.0" // The binary data that describes the LED state for each symbol // A(top) B(top right) C(bottom right) D(bottom) // E(bottom left) F(top left) G(middle) H(dot) const unsigned char symbols[16] = { //(msb) HGFEDCBA (lsb) 0b00111111, 0b00000110, 0b01011011, 0b01001111, // 0123 0b01100110, 0b01101101, 0b01111101, 0b00000111, // 4567 0b01111111, 0b01100111, 0b01110111, 0b01111100, // 89Ab 0b00111001, 0b01011110, 0b01111001, 0b01110001 // CdEF }; int transfer(int fd, unsigned char send[], unsigned char rec[], int len){ struct spi_ioc_transfer transfer; //the transfer structure transfer.tx_buf = (unsigned long) send; //the buffer for sending data transfer.rx_buf = (unsigned long) rec; //the buffer for receiving data transfer.len = len; //the length of buffer transfer.speed_hz = 1000000; //the speed in Hz transfer.bits_per_word = 8; //bits per word transfer.delay_usecs = 0; //delay in us // transfer.cs_change = 0; // affects chip select after transfer // transfer.tx_nbits = 0; // no. bits for writing (default 0) // transfer.rx_nbits = 0; // no. bits for reading (default 0) // transfer.pad = 0; // interbyte delay - check version // send the SPI message (all of the above fields, inc. buffers) int status = ioctl(fd, SPI_IOC_MESSAGE(1), &transfer); if (status < 0) { perror("SPI: SPI_IOC_MESSAGE Failed"); return -1; } return status; } int main(){ int fd, i; // file handle and loop counter unsigned char null=0x00; // sending only a single char uint8_t mode = 3; // SPI mode 3 // The following calls set up the SPI bus properties if ((fd = open(SPI_PATH, O_RDWR))<0){ perror("SPI Error: Can't open device."); return -1; } if (ioctl(fd, SPI_IOC_WR_MODE, &mode)==-1){ perror("SPI: Can't set SPI mode."); return -1; } if (ioctl(fd, SPI_IOC_RD_MODE, &mode)==-1){ perror("SPI: Can't get SPI mode."); return -1; } printf("SPI Mode is: %d\n", mode); printf("Counting in hexadecimal from 0 to F now:\n"); for (i=0; i<=15; i++) { // This function can send and receive data, just sending now if (transfer(fd, (unsigned char*) &symbols[i], &null, 1)==-1){ perror("Failed to update the display"); return -1; } printf("%4d\r", i); // print the number in the terminal window fflush(stdout); // need to flush the output, no \n usleep(500000); // sleep for 500ms each loop } close(fd); // close the file return 0; } |
|
1 2 3 4 5 6 7 8 9 10 11 12 13 14 15 16 17 18 19 20 21 22 23 24 25 26 27 28 29 30 31 32 33 34 35 36 37 38 39 40 41 42 43 44 45 46 47 48 49 50 51 52 53 54 55 56 57 58 59 60 61 62 63 64 65 66 67 68 69 70 71 72 73 74 75 76 77 78 79 80 81 82 |
#include<stdio.h> #include<fcntl.h> #include<unistd.h> #include<termios.h> #include<string.h> #include<stdlib.h> #include<wiringPi.h> #define LED_GPIO 17 // Sends a message to the client and displays the message on the console int message(int client, char *message){ int size = strlen(message); printf("Server>>>%s\n", (message+1)); // print message with new line if (write(client, message, size)<0){ perror("Error: Failed to write to the client\n"); return -1; } write(client, "\n\rERPi>", 7); // display a simple prompt return 0; // \r for a carriage return } // Checks to see if the command is one that is understood by the server int processCommand(int client, char *command){ int val = -1; if (strcmp(command, "LED on")==0){ val = message(client, "\r[Turning the LED on]"); digitalWrite(LED_GPIO, HIGH); // turn the physical LED on } else if(strcmp(command, "LED off")==0){ val = message(client, "\r[Turning the LED off]"); digitalWrite(LED_GPIO, LOW); // turn the physical LED off } else if(strcmp(command, "quit")==0){ // shutting down server! val = message(client, "\r[goodbye]"); } else { val = message(client, "\r[Unknown command]"); } return val; } int main(int argc, char *argv[]){ int client, count=0; unsigned char c; char *command = malloc(255); wiringPiSetupGpio(); // initialize wiringPi pinMode(LED_GPIO, OUTPUT); // the LED is an output if ((client = open("/dev/ttyAMA0", O_RDWR | O_NOCTTY | O_NDELAY))<0){ perror("UART: Failed to open the file.\n"); return -1; } struct termios options; tcgetattr(client, &options); options.c_cflag = B115200 | CS8 | CREAD | CLOCAL; options.c_iflag = IGNPAR | ICRNL; tcflush(client, TCIFLUSH); fcntl(STDIN_FILENO, F_SETFL, O_NONBLOCK); // make reads non-blocking tcsetattr(client, TCSANOW, &options); if (message(client, "\n\rRPi Serial Server running")<0){ perror("UART: Failed to start server.\n"); return -1; } // Loop forever until the quit command is sent from the client or // Ctrl-C is pressed in the server's terminal window do { if(read(client,&c,1)>0){ write(STDOUT_FILENO,&c,1); command[count++]=c; if(c=='\n'){ command[count-1]='\0'; // replace /n with /0 processCommand(client, command); count=0; // reset the command string } } if(read(STDIN_FILENO,&c,1)>0){ // can send from stdin to client write(client,&c,1); } } while(strcmp(command,"quit")!=0); close(client); return 0; } |
|
1 2 3 4 5 6 7 8 9 10 11 12 |
#include<stdio.h> #include<stdlib.h> #include<gps.h> int main(){ gps_init(); // initialize the device loc_t gps; // a location structure gps_location(&gps); // determine the location data printf("The RPi location is (%lf,%lf)\n", gps.latitude, gps.longitude); printf("Altitude: %lf m. Speed: %lf knots\n", gps.altitude, gps.speed); return 0; } |
External Resources
- The I²C Manual, Jean‐Marc Irazabal and Steve Blozis, Philips Semiconductors, TecForum at DesignCon 2003 in San Jose, CA, on January 27, 2003, at http://www.nxp.com/documents/application_note/AN10216.pdf
- The Linux I²C Subsystem , at i2c.wiki.kernel.org.
- Serial Programming Guide for POSIX Operating Systems, 5th ed., Michael R. Sweet, 1994‐99, at http://www.cmrr.umn.edu/~strupp/serial.html
- Serial Programming HOWTO, Gary Frerking, Revision 1.01, at http://tldp.org/HOWTO/Serial-Programming-HOWTO/
Some High-Resolution Figures from this Chapter

Errata
None for the moment
On working through the material in Chp08 I have been unable to disable the serial-getty service basically because the setup is not as detailed in the book ie: systemctl|grep ttyAMA0 does not bring up the serial-getty@ttyAMA0.service. I have been able to find what seems to be the serial-gettyservice by using ‘systemctl|grep tty’ which gives five other lines of code are highlighted but I have not been able to disable this service and the gps does not connect as I presume that the UART on the chip is still running the serial-getty service.
I am running a RPI3 with an up to date OS.
All the best Jeff Haddow
On Pi3b ttyAMA0 is used by Bluetooth. You can add ‘dtoverlay=pi3-disable-bt’ to /boot/config.txt to disable Bluetooth and restore GPIO use of serial port.
HTH Greg
the socket ttyAMA0 is tied to the group ‘dialout’ not ‘tty’ as the o/p below shows:
pi@workbench:/dev $ ls -l ttyAMA0
crw-rw—- 1 root dialout 204, 64 Jan 4 17:34 ttyAMA0
how ca I fix this and disable the serial-getty service
further /etc/initab dowe not exist and
the other route to disable it gives the following:
systemctl | grep ttyAMA0
sys-devices-platform-soc-3f201000.uart-tty-ttyAMA0-hci0-rfkill1.device loaded active plugged /sys/devices/platform/soc/3f201000.uart/tty/ttyAMA0/hci0/rfkill1
sys-devices-platform-soc-3f201000.uart-tty-ttyAMA0-hci0.device loaded active plugged /sys/devices/platform/soc/3f201000.uart/tty/ttyAMA0/hci0
sys-devices-platform-soc-3f201000.uart-tty-ttyAMA0.device loaded active plugged /sys/devices/platform/soc/3f201000.uart/tty/ttyAMA0
as you can see no serial-getty@ttyAMA0.service
All the best
Jeff Haddow
I have also encountered issues with UART setup, but have found solutions.
On rpi and rpi2, there are two things that must be performed (linux 4.4.34+):
1. Disable kernel control of the serial port. Edit /boot/cmdline.txt as described in http://elinux.org/RPi_Serial_Connection. Search for cmdline.txt.
pi@raspberrypi:~/bin $ cat /boot/cmdline.txt
#dwc_otg.lpm_enable=0 console=tty1 console=serial0,115200 root=/dev/mmcblk0p2 rootfstype=ext4 elevator=deadline fsck.repair=yes rootwait
dwc_otg.lpm_enable=0 console=tty1 root=/dev/mmcblk0p2 rootfstype=ext4 elevator=deadline fsck.repair=yes rootwait
2. Disable serial-getty@ttyAMA0. However it’s not enough to use systemctl disable… as explained in http://stackoverflow.com/questions/21596384/cannot-disable-systemd-serial-getty-service
For rpi3, it seems that renaming of device names is causing problems. ttyAMA0 is used for bluetooth. Serial device is instead attached to ttyS0, see eLinux again, http://elinux.org/RPi_Serial_Connection. Search for cmdline.txt.
I am trying to use WiringPi for I2C on the RPi. More specifically I want to build my RPi app using Eclipse on my Linux VM.
I have read chapter 7 and I’ve watched the video and I am able to cross compile on my Linux VM and deploy and run them on the RPi. The reason I can do this is because your book and your video are superb. I have never found such a easy to understand lesson on a difficult subject like cross compilation. I’ve unsuccessfully struggled with it for years until I found your book and video. THANK YOU!
I am now ready to try to use the WiringPi library to build an app using I2C. I’ve installed and built WiringPi using my Linux VM. I’ve got the paths setup properly in Eclipse. I can build my app. But it won’t link. When I link Eclipse complains my libwiringPi.so file has the wrong file format. I know why this is. It is because I built it using my amd64 toolchain not the armhf toolchain. Can anyone tell me how to build with the armhf toolchain?
I know I can build the library on my RPi and copy it to the Linux VM, but I don’t want to do that. I’d like not have to do development things on the Rpi. I’d prefer to build my library on my Linux machine. Is this possible?
Lastly I’d also like to be able to deploy my app, and all required libraries to a new RPi installation. Is this possible with Eclipse? Will it install my binary as well as needed libraries? If not I might as well get used to having to install WiringPi on every RPi I want to use it on and copy it to the Eclipse machine.
Thanks again for such a great book and video. After I play around with the RPi I plan to purchase a BeagleBone Blue and develop on it. Will you be making a book for the BB Blue?
In chapter 8 the wiringPi directory, the DS3231.c program needs to convert from bcd to decimal.
Add your bcdToDec function above int main():
int bcdToDec(int b) { return (b / 16) * 10 + (b % 16); }
Change the main code to:
int secs = bcdToDec(wiringPiI2CReadReg8(fd, 0x00));
int mins = bcdToDec(wiringPiI2CReadReg8(fd, 0x01));
int hours = bcdToDec(wiringPiI2CReadReg8(fd, 0x02));
Dear Sir, thanks a lot for the wonderful book on the RPi. i am learning a lot through it. i need some help on SPI port. Till now i have executed the first 4 programs as taught by the book but unfortunately none of them have given the desired output. i checked the SPI port and it works fine independently but not when expanded into a circuit. i ran the same code as i got from GitHub but same result. So i am not sure where I am going wrong. works great with I2C though.
can you please help me get this going right? would love to get this thing of my back as soon as i can to regain confidence.
regards,
Vikrant
Thank you for a well written, informative book that is a joy to study. I am working through Chapter 8 on a RPi 3 running Linux version 4.9.53-v7+ and have just used raspi-config to update /boot/config.txt to enable SPI. Page 333 says that this will add spi-bcm2708 to modules. however I get:
anthony@mypie:~ $ lsmod | grep spi
spidev 7373 0
spi_bcm2835 7596 0
And I cannot find spi-bcm2708 in /lib/modules/* Is this an error in the book or a change caused by an upgrade to the system??
Anthony
I’m confused as to why the following changes to listing 8-1 do not give the correct result:
int bcdToDec(int b) {
int result=0;
result += (0x70 & b)*10; // MSB *10
result += (0x0F & b); // LSB
return result;
}
and in the main code change
char buf[BUFFER_SIZE];
to
int buf[BUFFER_SIZE];
Any explanation??
@Anthony Lucas
6by9 says from the raspberry pi fourm…
“There was a change between iirc the 4.4 and 4.9 kernels to use the upstream bcm2835-i2c driver instead of the older bcm2708-i2c one. Even Jessie had gone to kernel 4.9 though, which would imply that you hadn’t updated the Jessie install for ages. “lsmod” will confirm which driver modules are loaded.”
From what I gathered is that spi_bcm2835 has been replaced with bcm2708. I ran into a similar issue while configuring i2c.
here’s another good link on information about that.
https://raspberrypi.stackexchange.com/questions/840/why-is-the-cpu-sometimes-referred-to-as-bcm2708-sometimes-bcm2835
If any of you are having problems with i2cdetect not recognizing any circuitry connected to the i2c bus turn off i2c from /boot/config.txt, reboot, and then turn back on. That fixed some problems I was having.
http://tinycc/erpi808 is not working.
Is this the correct document (APPLICATION NOTE Bi-directional level shifter for I2C-bus and other systems. AN97055)?
http://datasheet.datasheetarchive.com/originals/distributors/Datasheets-25/DSA-492462.pdf