Introduction
This is the chapter web page to support the content in Chapter 2 of the book: Exploring Raspberry Pi – Interfacing to the Real World with Embedded Linux. The summary introduction to the chapter is as follows:
In this chapter, you are introduced to the Linux operating system and software tools that can be used with the Raspberry Pi (RPi). This chapter aims to ensure that you can connect to your board over a network or serial connection and control it using basic Linux commands. RPi-specific configuration tools are examined for customizing and for updating the software on your board. By the end of this chapter, you should be able to control an onboard system LED having followed a step-by-step guide that demonstrates how you can use Linux shell commands in a Linux terminal window. The chapter finishes with a discussion on how to shut down or reset the board safely and correctly.
Learning Outcomes
After completing this chapter, you should be able to:
- Communicate with the RPi from your desktop computer using a network connection.
- Communicate with the RPi using a fallback serial connection with a USB to-TTL 3.3 V cable.
- Interact with and control the RPi using simple Linux commands.
- Perform basic file editing using a Linux shell terminal.
- Manage Linux packages and set the system time.
- Use RPi-specific utilities to further configure the RPi.
- Use Linux sysfs to affect the state of the RPi onboard LEDs.
- Safely shut down and reboot the RPi.
Digital Media Resources
Here the digital resources referred to in the chapter web page are provided. There are high-resolution versions of some of the important figures and links to videos, resources and websites that are described in the chapter.
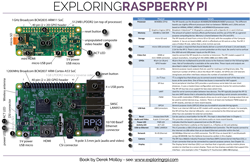
Raspberry Pi Poster
The Raspberry Pi Poster is available for download as high-resolution PNG raster format and a high-resolution PDF vector-mapped format images using the following links:
- The Raspberry Pi Poster [PDF Format (6MB)] [PNG Format (6MB)]
The poster images are large format images that have been rendered for an A3 page size, which is 11.69″ x 16.53″ (29.7cm x 42.0cm) in dimension.
External Resources
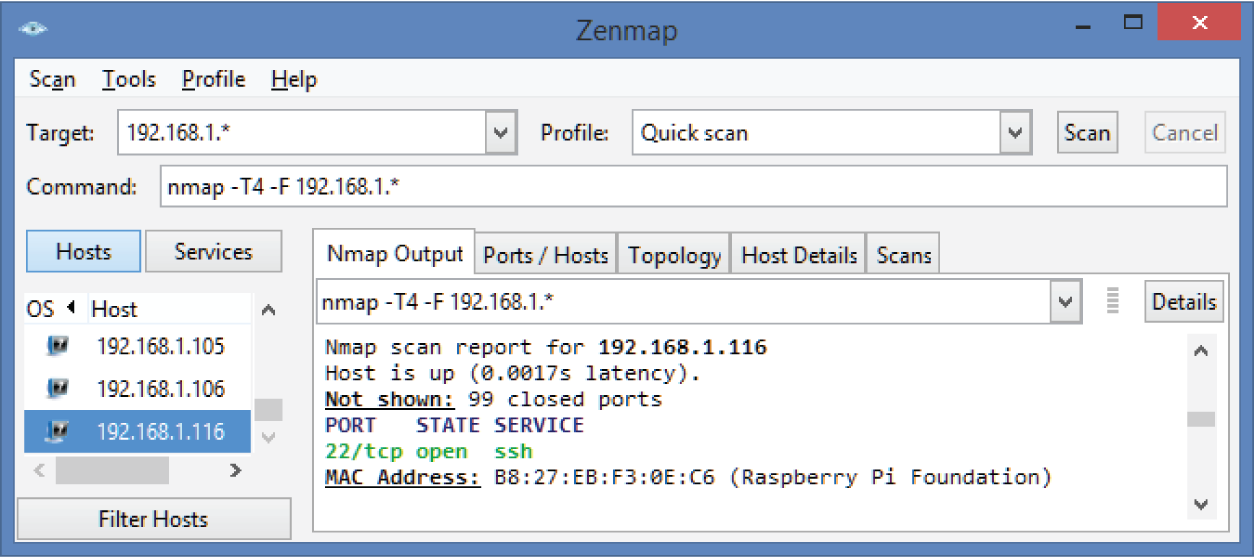
Zenmap is described in the chapter as a tool for scanning your network to find a network-attached Raspberry Pi. You are searching for an entry that has one open ports (e.g., 22 for SSH). It may also identify itself with The Raspberry Pi Foundation. You can see the Zenmap application in action in the image to the left where 192.168.1.116 is the location of the Raspberry Pi on my network.
Important Documents
-
- The Raspberry Pi Documentation: This is the official documentation for the RPi that is written by the Raspberry Pi Foundation. It includes guides on getting started, configuration, guides to Linux distributions and more. See raspberrypi.org/documentation/
- Broadcom BCM2835 ARM Peripherals Datasheet: This is the core document that describes the processor on most RPi models (except the RPi 2). It is 200 pages long and provides a technical description of the functionality and capabilities of the processor on the RPi. See tiny.cc/erpi103. There is also an important errata document at tiny.cc/erpi104.
- The BCM2836 Document: This document describes features of the processor on the RPi 2 and should be read in association with the previous Broadcom document for the BCM2835. tiny.cc/erpi105.
Important Web Sites
- The Raspberry Pi Foundation website: This provides the main support for the RPi platform, with blogs, software guides, community links, and downloads to support your development. See raspberrypi.org.
Recommended Books on the Content in this Chapter
Errata
None for the moment


Hello, on page 49, I would think that the command to update the firmware w/o the kernel would be: sudo SKIP_KERNEL=1 rpi-update, wouldn’t it?
On page 53, the procedure written to make the heartbeat appear on the power LED does not work.The power LED is solid after reboot. The 2 lines added were still at the end of config.txt after the reboot.
On RPi 3 the red power LED cannot be controlled in the way described in the book (pages 50-53). Apparently they changed the functionality. So the “heartbeat” proposed on page 53 will not work on RPi 3. It should work on RPi 2. The activity LED (LED0) is still available for control.
Section- ‘What time is it?’
I have a headless RPI3 with the onboard wifi, and was sidetracked for an hour or so while reading this book because I could not get the time synced up with the default ntp.service (I installed ntpdate which works ok, but I think). I stumbled upon the following page after much searching-
https://www.raspberrypi.org/forums/viewtopic.php?f=28&t=141454
I added the following line to /etc/rc.local as described-
/sbin/iptables -t mangle -I POSTROUTING 1 -o wlan0 -p udp –dport 123 -j TOS –set-tos 0x00
rebooted, and now ntp works ok (ntpq -p will show whether ntp is working- lots of 0’s means its not working 🙂 )
I commented out the added line to rc.local and tested again to double check- without this line I cannot get ntp to communicate with the time servers. The thread linked above was started over 6 months ago so it appears it still can be a problem for some (I have the latest Jessie Lite installed).
Thanks, that is very useful information
New versions of Raspian have SSH disabled by default. You have to add a file called “SSH” to the /boot/ directory to enable it at boot. The file is deleted on first boot.
https://www.raspberrypi.org/blog/a-security-update-for-raspbian-pixel/
A fresh Raspian install does NOT have SSH enabled. I had to boot into the desktop and then go to configuration and turn on SSH. Once I did this, Putty was able to connect. From reading this chapter it seemed like you just plug in the network cable, run putty, put in the IP address with Port 22 and Bob’s your uncle. Ain’t so.
There is no need to boot into the desktop. The link given by Dan (https://www.raspberrypi.org/blog/a-security-update-for-raspbian-pixel/) explains that placing a file called ‘ssh’ in the /boot/ directory of the SD card will enable ssh on first boot:
“The boot partition on a Pi should be accessible from any machine with an SD card reader, on Windows, Mac, or Linux. If you want to enable SSH, all you need to do is to put a file called ssh in the /boot/ directory. The contents of the file don’t matter: it can contain any text you like, or even nothing at all. When the Pi boots, it looks for this file; if it finds it, it enables SSH and then deletes the file.”
page 29:
pi@raspberrypi:~ $ systemctl status avahi-daemon
gives the following output and gets stuck ( I have to stop to continue typing)
● avahi-daemon.service – Avahi mDNS/DNS-SD Stack
Loaded: loaded (/lib/systemd/system/avahi-daemon.service; enabled; vendor preset: enabled)
Active: active (running) since Fri 2018-03-23 17:48:09 UTC; 1min 9s ago
Main PID: 367 (avahi-daemon)
Status: “avahi-daemon 0.6.32 starting up.”
CGroup: /system.slice/avahi-daemon.service
├─367 avahi-daemon: running [raspberrypi.local]
└─369 avahi-daemon: chroot helper
Mar 23 17:48:09 raspberrypi systemd[1]: Started Avahi mDNS/DNS-SD Stack.
Mar 23 17:48:09 raspberrypi avahi-daemon[367]: Network interface enumeration completed.
Mar 23 17:48:09 raspberrypi avahi-daemon[367]: Server startup complete. Host name is raspberrypi.local. Local
Mar 23 17:48:09 raspberrypi avahi-daemon[367]: Service “raspberrypi” (/services/multiple.service) successfull
Mar 23 17:48:12 raspberrypi avahi-daemon[367]: Joining mDNS multicast group on interface eth0.IPv6 with addre
Mar 23 17:48:12 raspberrypi avahi-daemon[367]: New relevant interface eth0.IPv6 for mDNS.
Mar 23 17:48:12 raspberrypi avahi-daemon[367]: Registering new address record for fe80::5511:d56a:ccaa:f71f o
Mar 23 17:48:16 raspberrypi avahi-daemon[367]: Joining mDNS multicast group on interface eth0.IPv4 with addre
Mar 23 17:48:16 raspberrypi avahi-daemon[367]: New relevant interface eth0.IPv4 for mDNS.
Mar 23 17:48:16 raspberrypi avahi-daemon[367]: Registering new address record for 192.168.3.102 on eth0.IPv4.
~
~
~
Therefore , trying to ssh with the domain name / ping raspberrypi.local from the linux machine says the it couldn’t find this host name
what can I do?
On windows, after installing bonjour print services, ping raspberrypi.local worked
But on the linux (virtual machine) it didn’t. What package/tool should I install and run on it ?